

Images from the Id – A Little Lesson In Color…or Is This Art?
Now that you’ve read the manual..right? Let’s do some shooting. Some say photography is all in the light. You bet! You get the light right and thereare only 2 billion other things to keep in mind. So, sure, I exaggerate but there are a lot of things going on. That’s why the “Auto” setting is so popular with beginners or with people who don’t what to be bothered. Yeah, they can get great pictures because the modern DSLR has a great little computer built in to it that makes some very good decisions for good looking average photography. But we want more, we want the ability to get the great shot not the average. To do that you need to do a little education and practice.
Light has two basic components you need to be aware of.
The first is color. Color is measured by temperature. For photographic purposes (printing is done differently) we have three primary colors, Red, green and blue shortened to RGB. Depending upon the color space you choose you will get different saturation and appearance of colors. Don’t confuse this with number of colors available- that is in the bit depth of the pixels. The most common bit depth of cameras is 8 bit, 12, bit or 16 bit. Most software works with 8 bit well. Some HDR (High Dynamic Range) software can use 32 bit. Your monitor can’t “see” that but it is useful for…HDR. That’s another topic. The are three basic color spaces, sRGB, Adobe RGB and ProRGB. Each offers an increase in contrast and saturation with greater differentiation between hues. If you care about how many colors are in each bit-depth look on Wikipedia. I set my camera at Adobe RGB and 12 bit RAW and the more I learn the more unsure I am about the color space. Jpegs are another topic but if you want to learn and grow shoot RAW.
The second is intensity or brightness of the light. Many of us depend upon the automatic exposure control to handle that but it can be easily fooled.
Myth – “I shoot for results in the camera, not in the software. Get it right without any processing” Those that say this, are usually converted film shooters. They are ignorant of fact the either the camera will process it or your software will. Which do you prefer? The camera has to do some work on the image and for many uses, sports, wedding etc. with a huge number of images, a well set up camera and quality jpegs are the solution. RAW files can’t even be view without a jpeg preview.So you must process one way or the other. Next week we’ll look at exposure and a little processing.
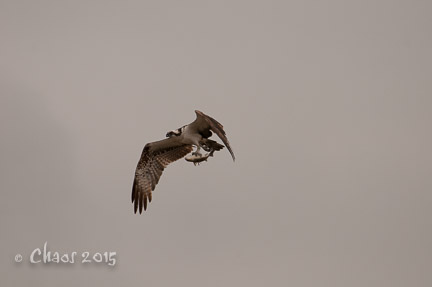
Image #1 – “ Osprey” This is jpeg of an original RAW file without processing. It was taken at Merritt Island, FL. It needs lots of work Taken with a Nikon D300, 1/2000 sec, f/6.3, EV, ISO 400, 400/600mm

Image #2 – “Catch” This is the after result. Next week specifics


