Rss

Been & Going

[Kicking Back with Jersey Joe] Walking the Brooklyn Bridge Funny Quiz

1 Star2 Stars3 Stars4 Stars5 Stars (No Ratings Yet)
Loading...

Jersey Joe takes a walk across the Brooklyn Bridge in New York City and takes some funny photos along the way.

The Brooklyn Bridge opened in 1883 and features a pedestrian walkway above the road bed and subway lines.  A popular spot for tourists, about 10,000 pedestrians cross the bridge every weekday.

THE 411

What: Brooklyn Bridge

Location: New York City, connecting Manhattan to Brooklyn

Year Opened: 1883

JERSEY JOE RECOMMENDS:

It’s a great, free, tourist attraction in the city.  In all the years I’ve lived here, I never actually took a walk across.  I definitely recommend that both tourists and locals do so.  Just make sure you keep right.  The bike lane is quite busy and New York City bikers are notorious for NOT obeying traffic rules.

blog 141 brooklyn bridge funny quiz.mov.00_01_03_34.Still001

[Kicking Back with Jersey Joe] Pedestrian Eavesdropping

1 Star2 Stars3 Stars4 Stars5 Stars (No Ratings Yet)
Loading...

No matter where you go these days — you’re on camera!  And some of these cameras have high power microphones.  So, be careful what you are saying!  Big brother is watching and listening as Jersey Joe explores.


THE 411

What: security cameras

Purpose: to record and monitor activities of the general public or to protect personal property

JERSEY JOE RECOMMENDS:

Remember, you are on camera just about anywhere you go.  Many of us even have cameras in our home.  Think twice before you pick that wedge in public next time!

Don’t forget – this was only played for comedy!

pedestrians-in-new-orleans_wkrrvqvxr-mov-00_00_02_29-still001

[Kicking Back with Jersey Joe] Let’s Play Caption This 2!

1 Star2 Stars3 Stars4 Stars5 Stars (2 votes, average: 5.00 out of 5)
Loading...

Jersey Joe showed you the funny pictures — you wrote the captions!  Now, see who came up with the best lines for these hilarious photos!

THE 411

Name: Caption This

What:  social media game played on @JerseyJoe50’s Twitter and Instagram feeds

When: new photos post every Monday 2pm Eastern / 11am Pacific

How to play: simply post your funniest caption for each picture shown

JERSEY JOE RECOMMENDS:

Don’t miss out on the fun — play along every Monday!!!

IMG_8184

[Images from the Id] – So I Have Been Gone for a While

1 Star2 Stars3 Stars4 Stars5 Stars (2 votes, average: 1.50 out of 5)
Loading...

Images from the Id – So I Have Been Gone for a While

How about some ranting? Sorry but I have always been a sceptic but as I get older I am becoming more and more cynical. As a liberal youth, I had a firm belief that the world would change and the future was bright. Now I know it’s bull shit! NOT liberalism but the possibility of a good future for the human race. Humans are not naturally good, as I used to think, but bad,bad bad. Please forgive me for generalizing those of you who are good and caring but there seems to be less and less. Luckily, I have millions of examples to work from. Let’s start with football.

Ball Pressure. Can you believe it! Just try to figure out two things. First, why is it so important? The only reason I see is big money and gambling. Second, why is there a problem? Duh, we learned years ago the fair thing to do was share the balls. It would be a non-issue if everyone used the same footballs. Am I stupid or?

I just love, love, love Super Bowls. Crap, I REALLY hate them. I guess my general dislike of the 1% who own the world spills over into the advertising campaign called the Super Bowl. Much of population watches the game but most watch because of the commercials. Do they really make you buy the product or is it entertainment? I can’t believe that much money is spent on something that causes the herd to buy, buy, buy. Is Bud really that good? I know of at least 100 breweries that make better beer and produce for flavor not sales but everyone loves horses. Present day football is designed for the gambler and the ad agency. It has nothing to do with sports competition or good values. I can remember when the touch game in the front of the vacant lot was more important than Florida verses Alabama. The problem started when sports became spectator instead of participation. Even in high school less students are participating and in those schools without the hype, less are spectating. I see about 15 high school football games a year and typical crowd is just several hundred. These kids play for all the good reasons. OK, sometimes the Super Bowl is a good game even when you’re rooting against both teams.

Something from this morning

Eagle 2a (1 of 1)

Image #1 – “ Bald Eagle”  I some places this is considered a pest but for me it is still a great shot.I have hundreds of Bald Eagle shots. They are very common here in the winter. Some of them are migrants from the north and just spend the winter. This morning was beautiful. The light is early so I was one site by 7:15. I have a pattern I follow at the lake, usually counter clockwise, to the dam then to the picnic tables on the edge. Today, I saw several at long distance  and they were just sitting, so I spent some time talking to other photographers. I have a short attention span so that helps. Some decent results. I changed plans and revisited the dam but this time went to the picnic area near the swim beach. A great choice, two eagles doing good things. Keep the shutter speed up, 1/1000 sec or faster. Try to use an aperture above f/7. Lenses are better not wide open. Adjust ISO to work with the rest to the exposure triangle, the relationship between the aperture, shutter and ISO to get a good exposure. Watch the light and the shadows. Shadows hurt bird shots. Try to keep the tree branches out of the frame. Result 110 good eagle shots and about 30 spectacular shots. Shot with the Nikon D7100. 1/5000 sec, f/6.3 good choice for this lens, 0 EV, ISO 400 (great light), The Nikor 80 mm – 400 mm lens at 400 mm, 600 mm with the crop factor of the camera . Minor processing in Lightroom.

Eagle 2b (1 of 1)

Image #2  – “Majestic” The same Bald Eagle. This is a 4th year immature, it will lose its white body feathers and back head feathers, possibly in the next molt. Shot with the Nikon D7100. 1/2000 sec, f/6.3 good choice for this lens, 0 EV, ISO 400 (great light), The Nikor 80 mm – 400 mm lens at 400 mm, 600 mm with the crop factor of the camera . Minor processing in Lightroom

[Images from the Id] Competition or How Thick Is Your Skin?

1 Star2 Stars3 Stars4 Stars5 Stars (No Ratings Yet)
Loading...

Images from the Id -. Competition or How Thick Is Your Skin?

Photography is a strange way of life. To paraphrase Edison to the extreme, who by the way I have less respect for than history does,tThe best photograph is 99% (perspiration)  in the mind and physical work and 1% in the equipment used (genius). My point is not so much in the numbers but in the leap of awareness that must be taken to achieve the goal of better images. Better still, here are some guidelines.

1- Make a cognitive decision as to what you want to do or accomplish. I have could call these “goals” or worse, a “mission plan” but I think this is different, it is more general. It could be practical and specific but make it a challenge

2 – Get the best equipment you can to support your vision. You may be surprised how simple or complex this may be. For example: to shoot people and street scenes sometimes even an iPhone or the smart phone may be enough. Shooting wildlife is another story and you will have to consider a DSLR and a telephoto lens. Take care not to get cheap junk, that 1000 mm lens advertised for $200 is worthless and if you expect quality results in this area be prepared for the expense of decent equipment. Camera $1000-2000 make sure it has simple fast adjustments. I like the Nikon D7100 or the Canon 7D Mk II. Both are ASP-C sensors giving an extra boast in magnification. Lens can go anywhere from $1000 to $10,000. You can get an excellent one $1000-3000 I use the Nikon 80mm – 400mm at $2800 it is amazing for most needs. You can get the older version for about $1200 and it is a nice lens just a little slower to focus. Canon has a similar lens too.

3 – Learn your equipment. Practice, practice, practice. Take thousands of shots preparing for the one and only chance.

4 – Learn the software. There are several ways to go here. If you are really serious spend the $9.99/month for the Adobe Photographer’s Package. It is a deal. Take the time to learn Lightroom correctly from the beginning. There are other ways. You cannot get by without processing skills.

5 – Join a club. This is probably one of the most important things to do early in your schedule. Pick a club with monthly presentations,competitions and critiques. You work will improve 10 times faster with instruction and get a thicker skin for others impression of your work. It also helps you make connections with other photographers and get involved in other activities.

Actually, the last is the place to start. You might be surprised where you end up.

Loon (1 of 1)


Image #1 – “ Common Loon”  This image is an example of practice and a good lens. I thought it was a Canada Goose and I always practice shooting these just for that one chance it is special. The image is pushed to its limits. I got about 20 shots as it flew in, most of them good. Exposure,depth of field and motion are well done. Taken with a Nikon D7100,1/5000 sec, f/5.6, 0 EV, ISO 400, 0 EV, 400/600 mm

Caiman Lizard (1 of 1)


Image #2  – “Caiman Lizard” Shot with the Nikon D7100. The San Diego Zoo is not my favorite zoo for photography. Try Albuquerque. This has won several awards in captive animal competitions. The difficulty here is the dark conditions of the Reptile house. One thing nice about San Diego is the Reptile House is partly in the open which sometimes helps, sometimes causes huge contrast problems and sometimes just makes it impossible to shoot. A tripod is out of the question. 1/15 sec, f/6.7 need a little depth of field, -1 EV rot help push the shot, ISO 800, 105/157 mm (a fixed focal length “prime” macro lens). Extensive processing in Lightroom

[Images from the Id] – The Image or The result.

1 Star2 Stars3 Stars4 Stars5 Stars (No Ratings Yet)
Loading...

Images from the Id – The Image or The result.

In the field, I usually try to walk quietly and be as inconspicuous as possible. That’s usually a lost cause. No matter what I do the ability to sneak up on wildlife continues to be a difficult thing to do. As a rule do your best- but here are some hints to help. Learn where the wildlife is and hopefully a little more tolerant of humans. I have a location for Wood Ducks, a location for Elk, etc. Find good locations and return to them often. Wildlife activities can change with the minute, hour, day, week, season and even year. Patience is a necessity. Don’t physically approach animals it can be dangerous to both you and the animal. In most locales it is actually illegal. Don’t feed or bait the animal. I have seen many spectacular raptor shot “created” by bait with mice. This is also illegal in many areas because it creates unnatural behavior and dependence on humans. The practice can actually cause animals to starve. OK, I do break this rule a little. I have a bird feeder in my backyard. I rationalize it by the amount of activity it creates and I am sure this is a  case of benefiting the activity and the birds won’t become overly dependent. Shoot during good times of the day if you can. Midday can cause many contrast and shadow problems. Careful of shadows at all times. They’re very difficult to work with.

In the camera, you must know your camera how to make it do things you want it to do. Basic problems revolve around lighting and catching action. Through practice you need to know the highest ISO the camera can do to your satisfaction. For most cameras you are limited to about ISO 800. Learn to overexpose a dark animal on a light background or underexpose a light animal on a dark background. Practice and bracket, take shots at several exposure setting. Check your histogram for any shots the are “peg” for butted up to the far right (light) or left (dark) sides. For flying birds, shot at or faster than 1/1000 of a second. Get your aperture less than wide open for more depth of field and sharpness. Shooting in RAW will give you more flexibility in processing but try to get the best file in the camera then you will get great images from your software.


osprey (1 of 1)


Image #1 – “ Landing”  This image won a second place at a wildlife competition. It is a perfect example of knowing where to expect to see Osprey close up.Good exposure,depth of field and motion is stopped. Taken with a Nikon D7100,1/2000 sec, f/6.7, EV, ISO 400, 0 EV, 240/345 mm


Deer (1 of 1)


Image #2  – “Winter Doe” Shot with the new .ikon D 750. The Rocky Mountain Arsenal Wildlife Refuge can guarantee at least one species. Last week it was Mule Deer. Tomorrow it may be Bison, Bald Eagle, or ? 1/1250 sec, f/5.6, 0 EV, ISO 500, 400 mm (a full frame camera)

[Images from the Id] – A Little Lesson In Color…or Is This Art?

1 Star2 Stars3 Stars4 Stars5 Stars (No Ratings Yet)
Loading...

Images from the Id – A Little Lesson In Color…or Is This Art?

Now that you’ve read the manual..right? Let’s do some shooting. Some say photography is all in the light. You bet! You get the light right and thereare only 2 billion other things to keep in mind. So, sure, I exaggerate but there are a lot of things going on. That’s why the “Auto” setting is so popular with beginners or with people who don’t what to be bothered. Yeah, they can get great pictures because the modern DSLR has a great little computer built in to it that makes some very good decisions for good looking average photography. But we want more, we want the ability to get the great shot not the average. To do that you need to do a  little education and practice.

Light has two basic components you need to be aware of.

The first is color. Color is measured by temperature. For photographic purposes (printing is done differently) we have three primary colors, Red, green and blue shortened to RGB. Depending upon the color space you choose you will get different saturation and appearance of  colors. Don’t confuse this with number of colors available- that is in the bit depth of the pixels. The most common bit depth of cameras is 8 bit, 12, bit or 16 bit. Most software works with 8 bit well. Some HDR (High Dynamic Range) software can use 32 bit. Your monitor can’t “see” that but it is useful for…HDR. That’s another topic. The are three basic color spaces, sRGB, Adobe RGB and ProRGB. Each offers an increase in contrast and saturation with greater differentiation between hues. If you care about how many colors are in each bit-depth look on Wikipedia. I set my camera at Adobe RGB and 12 bit RAW and the more I learn the more unsure I am about the color space. Jpegs are another topic but if you want to learn and grow shoot RAW.

The second is intensity or brightness of the light. Many of us depend upon the automatic exposure control to handle that but it can be easily fooled.

Myth – “I shoot for results in the camera, not in the software. Get it right without any processing” Those that say this, are usually converted film shooters. They are ignorant of fact the either the camera will process it or your software will. Which do you prefer? The camera has to do some work on the image and for many uses, sports, wedding etc. with a huge number of images, a well set up camera and quality jpegs are the solution. RAW files can’t even be view without a jpeg preview.So you must process one way or the other. Next week we’ll look at exposure and a little processing.

Original osprey (1 of 1)

Image #1 – “ Osprey”  This is jpeg of an original RAW file without processing. It was taken at Merritt Island, FL. It needs lots of work Taken with a Nikon D300, 1/2000 sec, f/6.3, EV, ISO 400,  400/600mm

Osprey 2 (1 of 1)

Image #2  – “Catch” This is the after result. Next week specifics


[Images from the Id] – So You Got the Camera, Now What?

1 Star2 Stars3 Stars4 Stars5 Stars (No Ratings Yet)
Loading...

Images from the Id – So You Got the Camera, Now What?

Oh, my aching back! After two weeks of growling at a pulled muscle I am finally functioning. I am glad this doesn’t happen often.

There is a certain responsibility which arrives with a new camera which is probably the most ignored factor in learning to become a good photographer. As a friend of mine says RTM – Read The Manual.  I don’t blame the photographer alone for this problem. I got a Nikon D 300 several years ago and the manual was over 400 pages, my new D 750 has 523 pages and those are just the English manuals! Now, I have trouble with anything over 20 pages. It’s a lack of concentration combined with a let’s get on with it attitude. I tend to fall asleep if the material is not a good mystery or Sci-fi. Luckily most of the manuals for the better cameras have great indices and tables of contents so a “how do I do this?”, approach can work well. You do need to take the time to get familiar with the manual and the look at some specific things you will need. To add to the insult our new Prius has 5 manuals from 20 pages to 450 pages. Is it really realistic to say, “Read the manual”? Let’s see, maybe I am trying to set the bar high or impossible. It’s time for a different approach.

Start by deciding which thing you must know to start getting the camera working. Second, decide how you want the camera to work for you. To get the thing to work you need to turn it on, charge the battery, format the memory card(s),  and find the button that takes a picture. That is just the beginning. Assuming you want to be a photographer, not just take snapshots and you got a camera that will keep up with your learning curve, there are a lot more you need to know. Most manufactures print a “Quick Start Manual” and they can be a great start. Take the Prius Quick Start manual. It sent me to 5 pages in the Owner’s Manual to set a radio station or something. Use the quick start as a guide to, of course, get started but also for your list. Here is my beyond the basics list to give you some ideas. 1) How is image quality selected and what does it mean? 2) How do I change ISO? 3) How do I Select the mode? (I like Aperture for beginners) 4) focusing mode? 5) Focusing area? 6) Exposure mode and area? 7) What’s VR or IS? (Hey that’s the lens) 8) Other, more than can be counted.

Another way is to think about what you want to do then look up how to do it. Example, How to I control depth of field? Research it and use the index. This work OK except there are many things in the manual you would never think of.

blog (2 of 2)

Image #1 – “ The Christmas Bridge”  Getting great shots of night lights is harder than you think. First requirement is a tripod to allow more choices of exposure and depth of field. The Nikon D750 has unbelievable low light performance and dynamic range. This was at Hudson Gardens Littleton CO. 8 sec, f/13 for Depth of Field (DoF), -2 EV to keep the lights down, ISO 100, 86 mm ( the D 750 is a full frame camera)

blog (1 of 2)

Image #2  – “Moon set at Albuquerque” This is a single shoot with no compositing. The exposure must be perfect for this dynamic range. Taken with the D  7100. 1/1000 sec, f/7.1 for DoF to get both moon and ballon in focus, ISO 400, – 2/3 EV, 112 mm/168 mm crop factor for the smaller sensor,


[Images from the Id] – Learning Photography or What to Get for the Holidays?

1 Star2 Stars3 Stars4 Stars5 Stars (No Ratings Yet)
Loading...

Images from the Id – Learning Photography or What to Get for the Holidays?

To be honest there are some reasons I miss the 60s. What a decade! Trips to the moon, college days, my Miranda single lens reflex camera and… Wait a minute NO WAY do I miss film, setting up my bathroom darkroom. Hey you want a complete darkroom for free? Hell, I’ll give you ten bucks to take it away! Actually the 21st century isn’t too bad except for politics and big business. Gee I said the same thing in the 60’s. So every decade has good and bad and sometimes they’re the same things.

Photography has gotten nothing but better. I have several friends which would argue that- but sorry, they lose! Digital photography has room for everyone. If it has any flaw it’s that anyone can do it. More importantly, with a little education, anyone can do it well. This has hurt the professional for two reasons. First, the prospective client thinks,”I can take that picture”. Second, the quality expected from the professional has skyrocketed.

Contrary to popular belief it is really hard to get professional quality. Other than the previously mentioned education, it is equipment which can make the difference. So what do you want for your photographic holidays? Look at the cameras and who they are for.

Point and Shoot – These do a great job for what they do and they quick shot. They are small light get great images. If you want to get beyond the snapshot and grow, these have the disadvantages of limited adjustability, no interchangeable lens and small (physical dimensions not megapixels), sensors. Not good for large prints. Will not shot RAW files. This is great for the traveling and family snapshots. These are dead end.

Mirror-less more advanced electronic view finder camera- These are adjustable with larger sensors, RAW files, great quality. They are super for the urban shooter and travel. A great step up can produce professional quality and have interchangeable lenses. The photographer can grow with these. Many pros have them in their bag.

DSLR – The digital single lens reflex camera. These come in mirrored and mirror-less, beginner to professional. With a $400 to $6000 price tag you may be tempted by the cheaper ones. Look for easy adjustability. This is usually $1000 and up. As you get more educated and expect more from your images you will want to learn how to control the result with quick easy control of the settings. There are three basic subdivisions. the First is called 4/3 because the sensor size is smaller. The top manufacturer is Olympus. Good for wildlife because of a 2x crop factor which means a 400 mm lens will give a 800 mm image. The ASP or DX sensor which have a 1.3 to 1.5 crop factor. Great for wildlife and greater ability for enlargement which balances out the advantage of the 2X crop factor of the 4/3. The last subtype, which many consider the Holy Grail, is the FX or full frame in these the sensor is the same size as a 35 mm negative. Usually low noise, great ISO sensitivity. Generally, it is the best for landscape and large high quality images. Again, if you want to grow get one that is easily adjustable.

My Christmas dream, a Nikon D750 (FX) but we’re talking about $3200 with a good lens. I now have only 3 lenses that would work on the FX. The DX lens can be used but will crop. Hmm… my Nikor 80 mm – 400 mm is FX 😎

Eagle D

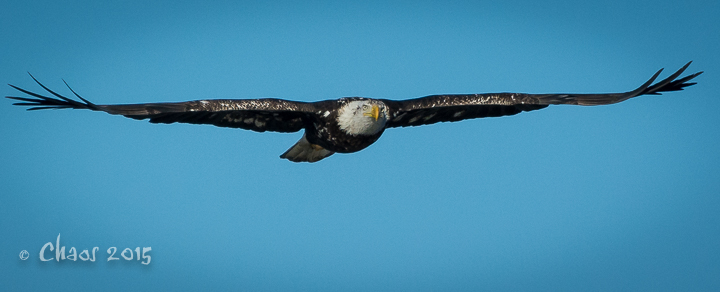
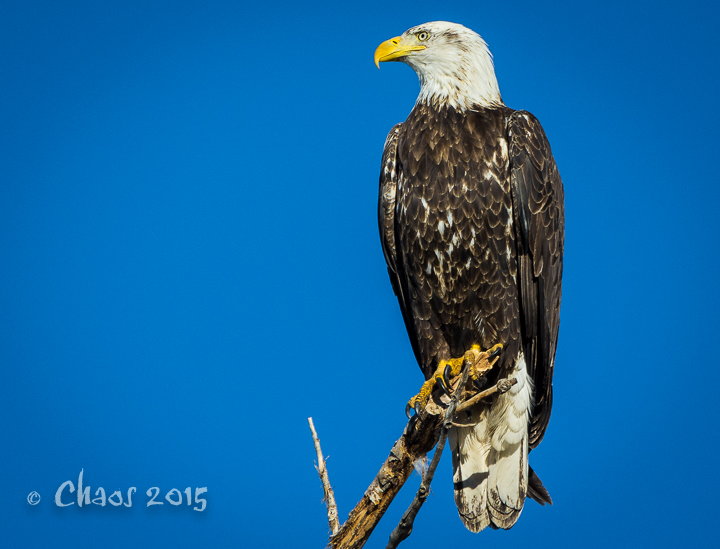
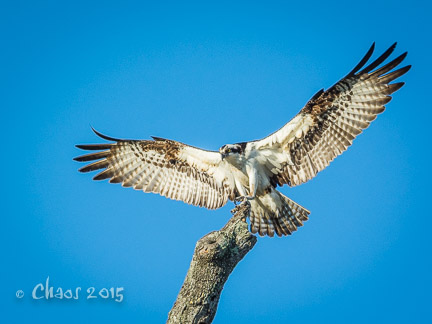
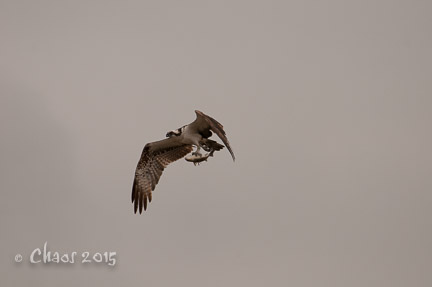
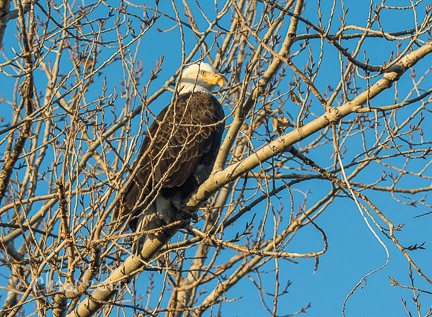
Image #1 – This Bald Eagle was in my backyard last week. I live in a suburb where these are rare in backyards. I went to the kitchen sink to wash my hands and saw this “big hawk”.This is probably a migrator from up north going to spend the winter in the Denver area.. In the days of film this would have won a prize but now it’s ho hum. Now we expect action, feeding, interaction, behavior etc. 1/1000 sec., f/5.6, needed for the high shutter speed, ISO 800, a good DSLR allows this with low noise, 180 mm 270 mm with the crop factor

Flower

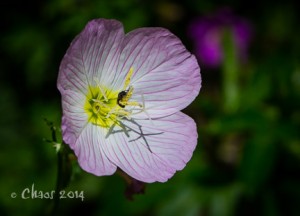
Image #2  – Just a nice flower and ant but it demonstrates how the background can be controlled with a DSLR. 1/640 sec, f/6.3, ISO 100, taken at 105 mm with a 105 mm Nikor macro lens. Gave me a lot of room to crop and quality