Rss

Been & Going

[Images from the Id] – Downtown, or What day is it?

1 Star2 Stars3 Stars4 Stars5 Stars (No Ratings Yet)
Loading...

Images from the Id – Downtown, or What day is it?

It’s a cold October morning and we need to make a decision. There are not as many easy choices because when it is cold, I am hard to get moving. Part of the choice is we want something different. We’ve done the mountains and I really don’t want go there. How about something “out of the my box”?  For me this is urban photography. The draw is the buildings with their lines and patterns and the people with their interaction and their place in that environment. The shoot needs to be planned. Timing is important to coincide with our desired result. If the sun shining and reflecting from the glass and metallic structures, we look for the early mornings and late afternoon but would expect long shadows which can get in the way. Other times of the day would give more people and interactions. The day of the week can also be significant. Parking and in some cities even navigation can be a consideration on weekdays. This is an early morning on a Sunday, which is a good time for photographing Denver. So there we were in lower downtown Denver, early on a Sunday morning. As the sun rose the city woke up and the light and activities evolve into spectacular architecture, good light and interesting people. This is a time for flexible equipment. This is because we would be moving fairly rapidly through the streets and shooting a variety of subjects. I carried 2 cameras one with an articulating LCD screen, Nikon D5100, and the other with more flexible controls and higher resolution, Nikon D7100. In the inevitable wisdom of the manufacturer, the D5100 is designed for the novice but I find the controls a problem to change quickly and get control of my photograph but the articulating screen makes it invaluable. The D7100 with its 1.5 crop factor means I can get closeups without being to close. Paired with a 18 mm – 200 mm lens. It gets a virtual 27 mm to 300 mm result. I put the D5100 in a small shoulder case with a 12 mm – 24 mm wide angle zoom. It also has a 1.5X crop factor which will not allow true 12 to 24 but it will be good enough till I get an extra $3K for and FX (full frame) camera. This points out the biggest advantage of the full frame sensor, with the sensor the same dimensions as the 35 mm film frame, 12 mm is 12 mm. I also carry an extra battery for each camera and polarizing filters. The polarizing filters would have no effect on light reflected from metal but work will in controlling flection from glass and for general glare. They will also add a little extra punch to the color of the photograph. I was looking for something different but not ignoring the obvious. Looking for interesting building, lines, patterns and people. As with all photography this takes practice, planing and time.

Downtown

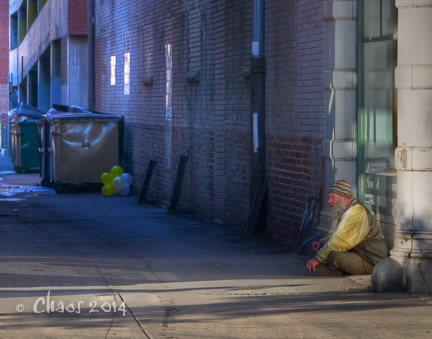
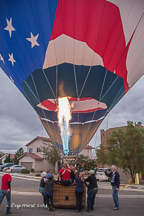
Image #1 – Getting urban environment is interesting. The homeless man and the discarded balloons in the alley tells a story.  1/2000  sec, -2.0 EV, f/8.0 ISO 800. This was 8:30 in the morning. he image was processed in Lightroom and Photoshop for dynamic range and color. Trying to get emotion in the image.

Denver Art Museum 3

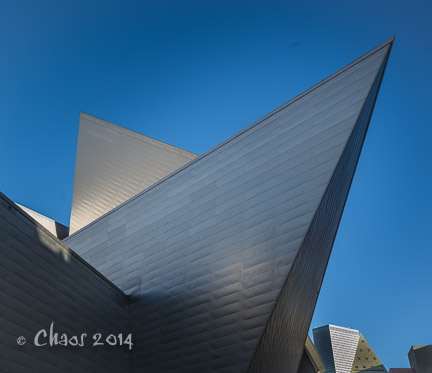
Image #2  – The Denver Art Museum is a wealth of angles and metal. 1/40 sec, f/13 (good depth of field), ISO 100. Processed Lightroom especially for glare control.

Denver Art Museum 2

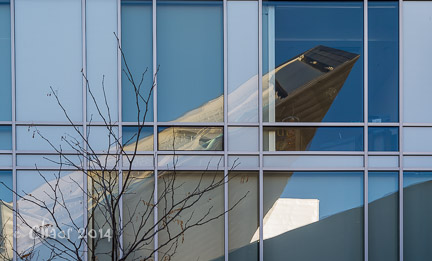
Image #3 – Reflection of the Denver Art Museum.1/40 sec, f/13 (again good depth of field), ISO 100. Processed Lightroom and the perspective was changed in Photoshop CC 14 with the Perspective Crop tool.


[Images from the Id] – Public Speaking, or do I Really Do This?

1 Star2 Stars3 Stars4 Stars5 Stars (No Ratings Yet)
Loading...

Images from the Id – Public Speaking, or do I Really Do This?

I have been teaching individuals in Photoshop and Lightroom and doing simple presentations to various groups and photo clubs for quite a while. Probably an off shoot of many years in a high school science classroom but this was all new. 

I had been invited to speak at a small local camera club last Monday. Topic – “Focus Stacking for the Real World”. My plan; arrive 6:30 pm, half hour before the club members. This is because the set up includes, computer, projector, two computer-projector connecting cables, tripod, camera, focusing rail,  two small studio lamps plus a lot of small parts and attachments. When presenting, I usually have a Keynote (Apple’s form of PowerPoint) presentation and a demonstration of the topic or procedure.

Have talked about focus stacking before but this is a different lesson, Be Prepared! Doing so many presentations has left me with little fear of audiences but if you panic all bets are off. Panic is the point where entropy takes over and everything falls apart. Now we all have learned in our Science classroom the entropy is that natural state of the universe where everything is going, where randomness over takes order. The only slowing of this inevitability is to add energy and work in the “organized direction. It’s a losing battle at least for a lifetime some sense can be made to our existence. Makes no difference what you do in photography, success depends upon being prepared. I the case of a presentation, I spend a lot of time going over the slide show and even more important, making sure I have done the procedure enough so it will go smoothly and if any problems come up (they always do) I can overcome them. Other examples would be. Make sure you know how to work your camera. I am not kidding. Read the camera manual. Practice the things you want to do photographically. I like to take shots of birds in flight and Raw image files. I use the manual to study the various modes of focusing and image capture and I shoot flying birds all the time. I, as I tell my students, go to a local radio control air field and shot the planes for practice. For the focus stacking, I spent about five hours over two days shooting for preparation.

The result, was a near prefect presentation. I had not realized it was advertised as part of a Meet-Up Group and about 80 people showed, standing room only. The largest group I have spoken to. Another thing nice is with a Meet-Up you get all those wonderful comments.

feather (1 of 1)

Image #1 – Practicing for the presentation, A focus stack of 27 images. Taken using Helicon Remote processed with Helicon Focus. 1/5  sec (tripod), f/9.0 best sharpness for the Nikor 105 mm Macro Lens, ISO 100.

shell (1 of 1)-2

Image #2  – Practicing for the presentation, A focus stack of 9 images. Taken using Helicon Remote processed with Helicon Focus. 1/8 sec (tripod), f/14.Actually not the best sharpness for the Nikor 105 mm Macro Lens, ISO 100.

shell (1 of 1)-2

Image #3 – Shot during the presentation, A focus stack of 23 images. Taken using Helicon Remote processed with Helicon Focus. 1/10  sec (tripod), f/7.1 best sharpness for the Nikor 105 mm Macro Lens, ISO 100.

[Images from the Id] – A Day in the Life of…or I want to go outside.

1 Star2 Stars3 Stars4 Stars5 Stars (No Ratings Yet)
Loading...

Here I sit in a cold wave. It’s very cold out and I really want to go out. If I go out I get cold. If I go out I take more photographs. If I take more photographs I get farther behind on processing and sorting images. So maybe it is time to sit here and get some WORK done. Argh! I thing I like least about what I do is sorting images. Problem? Yeah, as I became a better photographer more and more of my images started looking good, good and bad. Bad because it became harder to make decisions on which to keep and how to process and that takes time. My excuse in the past for not processing has been, honestly, to put it off until winter, Then, 3 species of Loon are spotted at Cherry Creek and I find a new beaver dam. So where should I be? We always have excuses for what we don’t want to do. Yes, it is nice to see results but sitting in a chair and staring at a computer?

We must have an assault plan. Here I go, time to get to it. The first weapon, and the thing that makes the goal seem reachable is Adobe Lightroom 5. As you may know, I have become a LIghtroom guru. I make extra money coaching it and Photoshop. Every serious photographers has a game plan, aka, workflow. The workflow should start with organization. It takes time and effort to come up with the organizational plan and Lightroom shines here. There are many ways to do it. I like to do it by date and shoot title. I do extensive key wording and rename the files to make Lightroom’s ability to search most useful. I do everything in Lightroom, that is what it is for, until I need to work on it in Photoshop or something else and even that is done through Lightroom. Some, I know, use Adobe Bridge. Its capabilities are much less than Lightroom. It was not designed for photographers and does not make workflow simpler. Lightroom not only keeps my 130,000 images organized but also all of the internal and external processing straight.

RMNP_2 (3 of 3)

Image #1 – From Moraine Park RMNP. The early “first light” at 7:10 am DST, gives the interesting color to the scene especially the sky. This is an HDR composite of 5 shots each varying by 1 f-stop above and below the average. This gives an extended dynamic range but does flatten the contrast. The information is for the average exposure. 0.5 sec (tripod), f/9.0, ISO 100, 75 mm.

RMNP_2 (2 of 3)

Image #2  – Thistle at Sprague Lake RMNP. This is an example of using the light. It was taken at dusk, about 5:00 pm DST this time of year. The background was a shadow. Exposure was lowered to produce a back background. 1/200 sec. this is where the expose was lowered, f/7.1 I did not want any more DOF (depth of field) wanted just enough to get the whole thistle in focus, ISO 100, 400 mm/600 mm (also helps control the DOF and the angle of the shot.

RMNP_2 (1 of 3)

Image #3 – Hallett Peak from Storm Pass RMNP. Taken in early light 7:30 am DST. Again a five image HDR. This allows the shadow detail and detail in the brighter areas. Using a tripod with the 24 mpix file gives the extremely high resolution. 1/13 sec (average image of the 5) , f/10 Trying to get the highest DOF possible with the ISO 100 70 mm.

[Images from the Id] – In Search of the Elusive Barn or How Did I Miss That?

1 Star2 Stars3 Stars4 Stars5 Stars (No Ratings Yet)
Loading...

Images from the Id – In Search of the Elusive Barn or How Did I Miss That?

Steamboat Springs Colorado is a great destination any time of the year except the late spring when the thaw occurs. This is affectionately called the “Mud Season” for good reason. We always make the Ballon Rodeo in early July and usually one more trip when it’s not Mud Season. So much for that, the problem here is when there is an iconic image you just have to have – what do you do? There are many of those shots in Steamboat and the one we were after this time was a Barn. We always go to the art shows and galleries when we are there and this barn shows up everywhere. We have been going to the area for years and never seen this barn. We had looked at just about all of the places we could think of to find it. On to other spots. Yampa Valley Botanic Gardens- a great little garden with many mountain species and great for photography,;Fish Creek Falls- maybe the original Coors Beer waterfall (I am not a beer drinker, even though in elementary school my best friend was one of the Coors family.) This is a great place to practice shooting moving water. Then I got an idea. Why not just ask where the barn is?  At one of the galleries I asked! “Oh yes, that barn is right behind the City Market” was the answer.  Oh, Crap! We travel this route four times a day to and from the condo. Next time, we looked and there it was surrounded by 10 artists painting it for a class. Time to shoot. On the downside, in the last four yeasr after we found the barn the city has decided to “renovate” it and condos and housing is rising around it, making the shot much more difficult. The best shot is in the winter with snow on Mount Werner, showing the ski runs, in the background. This last trip we were hoping for snow but Mother Nature had 60 degrees in the plan.

Barn 1 (1 of 1)

This barn is only about 100 yards from the condo and actually in the corner of a parking lot. No one seems interested in it and the background is difficult. Taken in July 2012 with a Nikon d5100, not my favorite camera!. HDR of 3 exposures, ISO 200, Average shutter 1/250, f/11, 55 mm


Barn 2 (1 of 1)

Another barn, farther away and across the Yampa River. Basically the same information on the same day as there last one. Taken in July 2012 with a Nikon d5100, not my favorite camera!. HDR of 3 exposures, ISO 200, Average shutter 1/250, f/11, 55 mm. Did have my D7100 yet, so why didn’t I use the D300?? Still nice but these more consumer/automatic cameras are hard for a pro to use.

More Barn 3 (1 of 1)

This is “The Barn” also known as the More Barn. Slightly different info. Taken in July 2012 with a Nikon d5100, not my favorite camera! (yep). HDR of 3 exposures, ISO 100, Average shutter 1/90, f/22, 52 mm

More Barn 2 (1 of 1)

My favorite of the More Barn. Taken this October. I love the natural look here. I was able to hide the new condo etc and show the ski hill. The light color of the hill is cause by trees that have been killed by disease carried by the Pine Beetle. AKA Beetle Kill, 1/13 sec (tripod), f/18 for depth of field, -1/3 EV, ISO 100, 50 mm My favorite camera the Nikon D7100

[Images from the Id] – On the Road Again or too Much and too Little?

1 Star2 Stars3 Stars4 Stars5 Stars (No Ratings Yet)
Loading...

Images from the Id – On the Road Again or too Much and too Little?

After almost two straight weeks of traveling and shooting, I think I have recovered and getting  back from a little exhaustion and even some photo burnout. The exhaustion is  more emotional than physical and the burnout is a combination of physically being on the move and mentally the result of over 3600 images! Don’t get me wrong I love the balloons and entertaining my sister-in-law, and avid and excellent photographer, but 3600 images and I thought I was being conservative. Me conservative, HA! Just remember, what goes in, snap, must come out, processing. I love the hunt but sometimes I am overwhelmed with just the prospect of sorting and  choosing the images to work on.  Adobe Lightroom 5 is a great help. Without it, I would be totally unable to function. Photographers talk ceaselessly  about their workflow or the procedure they use to catalog, sort and process their images. With the coming of Lightroom it has became and endless discussion of what the best workflow is. I have seen professional photographers who use 4 pieces of software and 45 minutes to do what I can do in 10 minutes with Lightroom. I have known them to waste time making endless, unneeded, Tiff file backup copies are unneeded with an understanding of Lightroom. Point is everyone needs a system. Every photographer from a beginner to pro needs to organize and establish a consistent workflow. For the casual photographer nothing is better than iPhoto or better yet Aperture. These can link all of your personal images together in one place. You iPhone, computer, iPad are all interlinked, but it is only for Apple hardware. The next step up would be Adobe’s Photoshop Elements which is for Windows and Mac. It includes organization software and is easy for the beginner. More advanced is the Adobe Photographers Creative Cloud Subscription. This includes Lightroom 5.6 and Photoshop CC 2014. It costs $9.99/month and is a good deal for those working at growing and producing the best they can. They both take effort to learn but are unlimited in possibilities

Back to my problem. I use  two basic rules for sorting. First, keep only images that you would like anyone else to see. Second, keep any personal images to document a trip or family.

Albuquerque? I’ll keep most of the balloon shots, what too cool. Steamboat Springs, the barn shots and the waterfalls, lots of instructional images there and some others. Eyes Park? Some good elk shots but the Landscapes were not too hot or actually too hot, no snow or color.

Image #1 – One solution to a problem, when the scene is dull with no contrast converting to black and white may help

Spanish Peaks (1 of 1)-2

Spanish Peaks 1/20 sec, f/20, ISO 100,105 mm, 0 EV Initial processing in Lightroom left these images flat and uninteresting. Converted this one to Black and White in Silver Effects Pro

Ludlow CO – The site of the Ludlow Miner Massacre April 20, 1914

Ludlow (1 of 1)

HDR processed in Photomatix Pro from 5 images 1 f-stop apart. information for average exposure –  1/50 sec, f/13, ISO 100,12 mm. I love the effect of the wide angle lens.

The Road to Santa Fe.


Road to Santa Fe (1 of 1)


Look for something unusual. 1/250 sec, f/11, ISO 100, 200 mm Processed in Lightroom. A good demonstration of selective focus. A smaller aperture such as f/22 and too much would be in focus. A bigger aperture such as f/5 and the background would be too blurry. Practice this often.

[Kicking Back with Jersey Joe] UFOs Over New York City and More!

1 Star2 Stars3 Stars4 Stars5 Stars (2 votes, average: 5.00 out of 5)
Loading...

UFO’s over New York City? That’s not all!  Jersey Joe features 3 never before seen photos and videos of UFOs, including his close encounter over the Pennsylvania countryside.

THE 411

What: UFO

Stand for: Unidentified Flying Objects

Years spotted: 1998, 2012, 2013

JERSEY JOE RECOMMENDS:

I honestly have no idea what these flying crafts are, but I made sure to capture my 2 on camera.  With everyone having a smart phone now, there’s no reason not to take a quick shot when you see something out of the ordinary.  Then, you can upload it to Twitter or YouTube and share your story.  Who knows – maybe others have just seen the exact same thing!

[Images from the Id] – Friday Morning at the Fiesta or 3:30 in the Morning?

1 Star2 Stars3 Stars4 Stars5 Stars (No Ratings Yet)
Loading...

Images from the Id – Friday Morning at the Fiesta or 3:30 in the Morning?

One of the things we do as photographers is make friends. It is the rare situation when a fellow photographer does like to meet others and talk shop. It is just as important to make friends with non-photographers, it can really pay off. Friday morning in Albuquerque, a bucket list payoff, a ride in a hot air balloon. I have explained about our friendship with the Dee III crew and it was time.

Dawn Patrol is a group of balloons, which because of a combination of training and equipment, is allow to fly before sunrise. As with all balloon flights, the possibility of a flight is dependent upon the weather. Rain and wind can prevent any flights. This year at ABQ the odds looked like about 50%. The plan was, 3:30 am alarm to meet the crew and ride into the Fiesta Park. One of the biggest problems with the Fiesta is parking. The lots are known to fill up by 6:30 am so the early rise is quite worth it. Entering with the balloon is the only way to go. We did this twice and in the future plan to make it the usual habit. On our flight day the weather looked good only a few high clouds.

If you are not familiar with the procedure, the balloon is laid out on a large tarp, in this case blue with white stars. The balloon is then inflated (never say “blown-up”) by two large gas powered fans. The top of the balloon is held down by one of the husky crew members. One of the things Tim, the pilot, likes to do is to take spectators, especially children, inside the balloon through the side vent. Once the balloon is inflated the pilot sets the top vent, this actually goes by many names including deflation vent, parachute vent, etc. At the bottom opening, the basket is on its side and has all of the ropes, cables and fuel lines correctly attached. The pilot does this him/herself to assure it is all correct. When everything is double checked the main propane burner is lit. This is spectacular in the dark. The sound is awe inspiring. The heat produced is aimed into the envelope and the balloon begins to rise from the ground. The crew member holding the top shows his value by keeping the rise under control. As the envelope becomes buoyant, the basket is brought to vertical and as many surrounding by-standers as possible are recruited to add ballast to keep the balloon on the ground. With a small amount of difficulty we climbed into the basket. I blinked and we were 50 feet into the air. Photographing was almost impossible. Low light, small basket and honestly excitement made it difficult. The night view of the city and the park was just beautiful. The balloons have two propane burners one for the hot flame and the other burns less oxygen creating less heat but a bright yellow flame which illuminates the envelope . This is spectacular. Thirty minutes later we skimmed low over the rooftops of a southwestern subdivision, nice to have the flat roofs of the adobe style homes, landing in the middle of a cul-de-sac. Quick, everybody in the chase crew hold on, we climb out of the basket, refuel, new passengers get in and a second take off. We are now part of the chase. The pilot expects the chase to be under the balloon at each landing basically to refuel and hold down the balloon. Navigating the streets at barely legal limits seems a superman task but we are there for landing number two in a field of tumble weeds. The balloon is made buoyant and walked to the street for a repeat, change passengers and refuel. The third chase begins. Morning is almost over, the air is warming and flying done. The third landing is next to a business and bystanders are recruited to help lay out the tarp and deflate. What a day! As I told Tim earlier, I am afraid of heights, Tim’s comment, “I am too” Result NO fear. It was just plain amazing and I will do it again, as I said, “Anytime ballast is needed”

This week I am just doing a gallery of shots. most where at high ISO (1600 or more) low shutter and wide open aperture. You will notice some camera or balloon motion.

Balloon (7 of 7) Balloon (6 of 7) Balloon (5 of 7) Balloon (4 of 7) Balloon (3 of 7) Balloon (2 of 7) Balloon (1 of 7)

[Images from the Id] – Sitting in Albuquerque With Something to Do or Did I Really Do That?

1 Star2 Stars3 Stars4 Stars5 Stars (No Ratings Yet)
Loading...

Images from the Id – Sitting in Albuquerque With Something to Do or Did I Really Do That?

Any one that knows me knows I have always had an extreme fear of heights. It manifests itself in climbing ladders, walking on the roof to service the cooler, anything above 5 feet will do. Fear, vertigo and general shaking will kick in but I also have the philosophy of challenging myself to the limits of my abilities and range of activities.

Scenario – After making fiends with a couple of hot-air balloon pilots about 3 years ago at the Steamboat Springs Balloon Rodeo, we kept in contact through Facebook etc. At the Rodeo this July, my wife “cons” Tim Taylor of Dee III  to take us for a flight. She was thinking of the Colorado Balloon Classic in Colorado Springs on Labor Day. Tim was extremely enthusiastic and suggested the Albuquerque Balloon Fiesta because although he would be at the Classic he would not be flying. Three months pass and with mixed emotions we arrive in Albuquerque. Understand, I don’t like large crowds and you can guess that the anticipation of a flight left me a little shaky.

Thursday morning, alarm at 5 am. Yes, balloons do fly in the cooler air and less wind of the morning. The day’s schedule included a Dawn Patrol of a few balloons with “running” lights launching before dawn, the inflation and assent of the special shape balloons, glow of the special shapes at dusk, then fireworks. We had ordered tickets in advance for the shuttle bus, bypassing the worst part of a large crowd, parking. To limit my description to a few words is very difficult. The fear of the crowd was no problem- the site is huge and the crowd is spread out. Then there’s the balloons. To use a term I generally hate, OH MY GOD, I have never experienced anything like that. I have seen and shot a lot of hot-air balloons but almost 500 in one place at one time was overwhelming. We found a spot about in the center of the field. Four Dawn Patrol ( I think that term maybe trademarked) balloons took off a little late. The sun started to gradually light the field and inflation began.

Hot-air balloons are first inflated by two portable gasoline powered fans. Once the balloon is inflated on the ground, the burner is fired up and the air heated to raise the envelope. The photo opportunities are infinite. I love shots of the colors and shapes of the balloons. Don’t forget to get the patterns of inside of the balloon as it fills from the fans. I have a couple of shots from the interior looking out. Albuquerque is a hard shot because so much is happening everywhere and the exposures are extremely difficult. You mush continually check your histogram and over-ride the camera. If you are very experienced with manual exposure you’re way ahead. The weather co-operated because the ability to fly needs almost perfect conditions and the skies where beautiful. 400 shots later, many will go in the trash, At 9 am, we happily return to the room via the shuttle. There was no glow that evening because of the weather but we missed our turn off of I-25 because of the fireworks. Next week, Friday Morning at the Fiesta or 3:30 in the Morning?

I think I counted 19 balloons in this shot. I have one shot with about 90 balloons. They just surround you. 1/320 sec, f/7.1,-1/3 EV, ISO 400, 90 mm/135 mm

Balloon-001


Chariot – One of 90 different special shape balloons. The details are great. 1/400 sec, f/5.0, ) EV, 65 mm/97 mm, ISO 100

Balloon-002


Pigasus – Flying pigs really do exist. 1/640 sec, f/5.0, )EV,ISO 400,70 mm/105 mm

Balloon-003


[Images from the Id] The Truth About Panoramas

1 Star2 Stars3 Stars4 Stars5 Stars (No Ratings Yet)
Loading...

Images from the Id – The Truth about Panoramas or Where in the hell do I find a frame for this?

Every one knows what a panorama is, right? And for fall – WOW! Well, digital photography has changed this as much as everything else. The iPhone and other smart phone have their way of doing it, while actually pretty cool. There is a little Microsoft (yuk; another story) call Photosynth which I actually like – it works! I have been using it for a while it makes panoramas on the iPhone, and I assume other smart phones, easy. Now ISO 8 has a built in panorama function, it may have been there before but I never looked for it. It does a pano in a continuous movement of the “camera” Pretty cool. If you want a bigger image for any one of a million reasons it’s time to learn how to get a good one with a camera. There are many ways to do this. You could just crop an image. Results could be good with a high pixel camera but it isn’t really a pano because the field of view is narrow depending on the lens and with a wide angle lens there goes the quality. Some cameras do it in camera but that is limited to jpegs and by now you should be shooting raw, except for sports and weddings. So what’s next?

Put your camera on a tripod. Hand holding will work but tales a  lot more practice and you get a lot of unusable junk. Level the tripod, most have built-in levels. Usually you want a level horizontal pan. Vertical pans come with more experience. Stand in one spot and don’t change the focal length (Don’t ZOOM!). Take a series of images across the scene over lapping 1/3 to get the software some the to work with. Once you have the images get them into Photoshop or Photoshop Elements as layers. I do this easily with Lightroom and “edit in Photomerge in Photoshop”. This is easy but search the web for more specific directs on how you are going to do it. There are also many third party pano merging software. One little extra trick is to take the pano series vertically, really nice. A little more advanced try merging HDR images.

Next week the art show.

Some panoramas of Rocky Mountain National Park

rm Pano-002

Image #1 This is a typical series of horizontal images. 5 as I remember. Very long and narrow. Each shot at 1/20 sec, f/16, 95 mm, ISO 200,19960 X 4055 pixels

rm Pano-003

Image #2  This is a pano taken with the camera vertical. Probably about 6 shots. 1/30 sec, f/22, 46 mm, ISO 200, 7331 X3852 pixels

rm Pano-001

Image # 3 This is a pano using 3 HDR braces for each of 5 vertical images total of 15 images. 46 mm, ISO 200, f /22, 7331 X 3858 pixels.