Rss

Been & Going

[Images from the Id] – Holiday Lights

1 Star2 Stars3 Stars4 Stars5 Stars (No Ratings Yet)
Loading...
Holiday Tree

Holiday Tree

Sometimes common sense should take precedence but our perception of what is common sense should be based upon success. Figure that one out. I guess the secret is to learn from others and use that in our own lives. To be successful in photography or if you just want to get better at photography, work at it. I have given you the basics of exposure that’s first step. Now to be specific let’s learn how to:

Photograph Holiday Lights- Holiday lighting consists of little bright dots in a sea of black. The automatic camera wants to see this as a neutral exposure with the average as gray. The camera will want a balanced histogram but this is one case where it needs to be weighted to the left to keep the darks dark. You probably don’t want the camera to make that choice for you.

First Rule of Lighting – Learn to use the exposure override adjustment. This is usually a button marked +/- on good cameras. Learn to adjust it quickly and easily. Practice. If my rule numbers seem confused don’t worry I don’t try to keep them straight.

Second Rule – Use a tripod and remote release such as a cable release, because you will be varying the exposure through a wide range and it makes it possible to use a low ISO for quality.

Third Rule – Take your time. You will want to experiment with different exposures and some other ideas we will discuss later. Take the time to try different thing out of your box. DON’T go with someone who is in a hurry to get through.

Fourth Rule – Shoot RAW

Fifth Rule – In this situation use the LCD to see the exposure not the histogram.

Sixth Rule – Dress warm. I found fingerless gloves for about $4

I will give the exposure information for these examples and some antidotes.
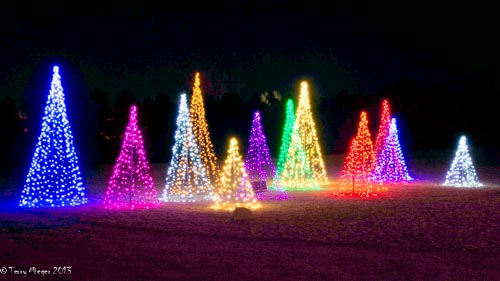
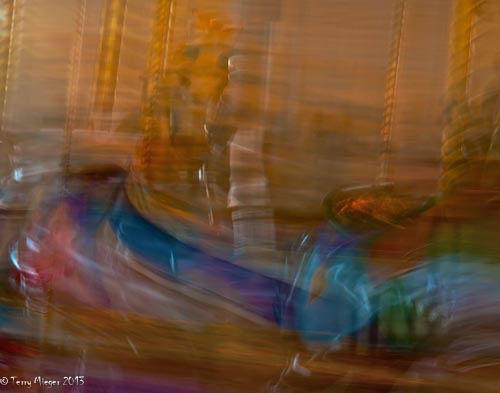
Auto matic Exposure

Automatic Exposure

Number 1 is at ISO 100 f-4.5 and 4.0 sec. This simulates where the camera would set the exposure.
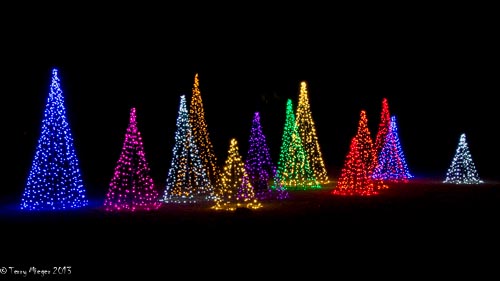
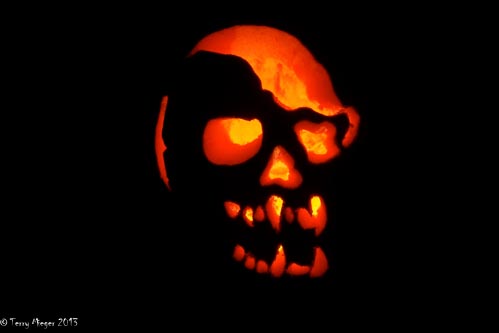
Lower Exposure

Lower Exposure

Number 2 is ISO 100 f-16 and 4.0 sec.  Same shot but I like just a little bit of the grass showing. You could make the grass disappear by a little less exposure. This is a minus 2 f-stop reduction in exposure other words  1/4 of the light.
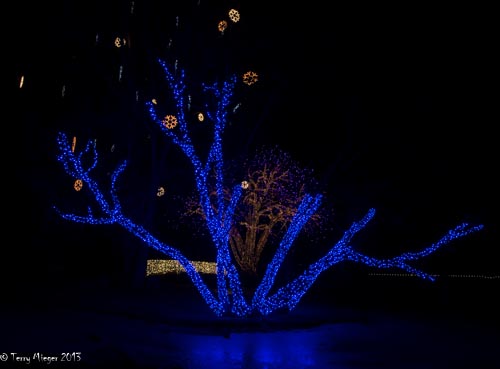
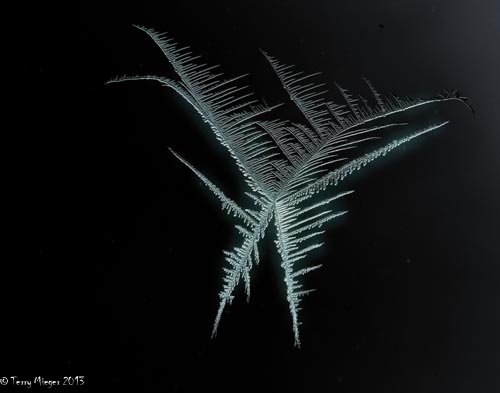
Blue Tree

Blue Tree

Number 3 is at ISO 100 f-16 and 1.0 sec. This is about minus 3 f-stops from the camera’s and needed very little software adjustment. It is 1/8 of the exposure the camera wants.
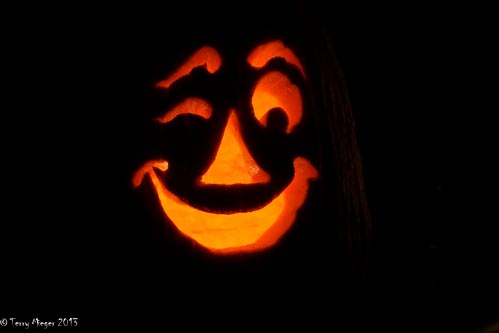
Snowman Effect

Snowman Effect

Number 4 is at ISO 400 f-22 and 0.7 sec This is a new experiment which has some promise. It was taken through the lens of one of those “glasses” the concessions sell. I had to keep the f-stop opening small because of the small size of the “filter”

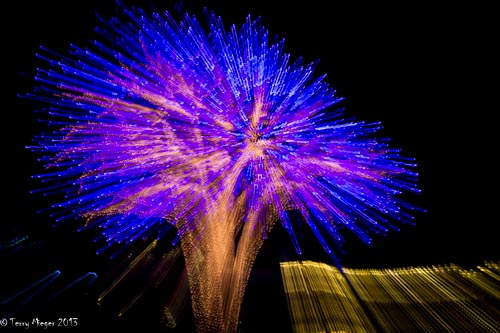
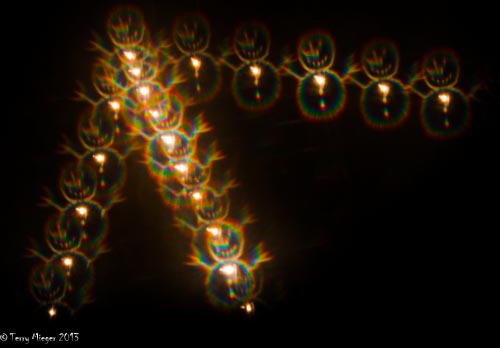
The Title Shot is more advance but easy to attempt. It is an in-camera double exposure zooming during the second exposure. Each exposure was ISO 100, f-11 and 2.0 sec. One last thing – As you get better, start using the camera’s manual mode. Once learned this will actually become quicker and easier. It will be very surprising to you how many photographs need a tweaking of the exposure. From now on we will be looking at specific shoots and how to succeed.

[Images from the Id] – The Histogram

1 Star2 Stars3 Stars4 Stars5 Stars (No Ratings Yet)
Loading...

Images from the Id – So why is everybody looking at the back of their camera?

The obvious answer is not necessarily the correct answer. Are they looking at the “picture”? Well, sort of. Advanced photographers may want to check the composition but they know, other than that, the LED screen doesn’t give much more. It can do much more when you understand what is important in the image you just took.  There is a setting, in almost all digital cameras, which can give the information use to judge the quality of the image.  This is called the histogram. The histogram is a graphic representation of the distribution of the tonal range of the image. This is nothing more than the distribution of light, dark and mid tones in the image, the contrast. This is important because it can tell you whether or not you have “clipped” any information from the image. This happened when the histogram graph is piled up on the extreme right (light side) or left (dark side). This means you have lost detail i.e.. information from that tonal range. Most of the time it is best not to clip detail because with the RAW file you have the ability to bring out that detail in the software. There is no such thing as the “perfect” histogram. The “Bell” curve doesn’t happen and actually there are time when you want to be tilted a little to the left or right. Example a snow scene should have more bright pixels, lean to the right, because snow is white not gray. That jack o lantern should be all dark and all light, nothing in the middle to just get the image of its face.

Next week – Putting it together or let’s see how it works

JACK 2-001

[Images from the Id] – The Raw Wars

1 Star2 Stars3 Stars4 Stars5 Stars (No Ratings Yet)
Loading...

Images from the Id: The RAW Wars.

OK we are done with the basics of exposure. Just one of those things you must remember. Those simple ideas have a great effect on your images.

Ice Angel

Shooting Raw

Most good cameras, beyond the smart phone, can capture images in what is called a RAW format. As a photographic educator I have heard hours of arguments about this. The battle is on. There is a very small number advanced photographers who shoot in jpeg format and do very good work but most of us shoot RAW. Raw is file format when the camera records in the file and all of the information available in the scene, that the sensor can record. Jpeg takes the information and compresses it to a smaller size. Sort of like condensing orange juice, something is removed (in the case of OJ, water) and something is missing. If you think reconstituted orange juice tastes the same as fresh maybe my argument is unimportant. There is a difference and it depends on whether you care or not. When a camera takes a jpeg it compresses it and usually a little computer makes a decision in a microsecond as to what it should look like. Many times it can work very well but most of us would rather make those decisions. The RAW file gives us the ability to make a much great range of adjustments on the images. Examples of adjustments that are better in RAW would be white balance, noise reduction, sharpening and dynamic range among others. In a jpeg image these are controlled by the camera not the photographer. Which do you want?

Before I go on let me make something clear. Jpegs are very important- just not as good for the capture of images. Computers and software can only render-see Jpeg images. So even a RAW file must have a Jpeg component so the computer can show it on the screen or the camera on its LCD.

Advantages of jpeg

1. Small file size about 1/4 (or less) that of a RAW file

2. Very good quality (depends more on the computer in the camera but most are good)

3. Less post-capture processing (that little computer again)

4 No conversion needed

Advantages of RAW

1. Much more control over various attributes of the image

2. Possibility for excellent (better) results

3. Photographer controlled

Disadvantages of jpeg.

1. Something is gone for ever. Unlike orange juice you just can’t throw the water back in.

2. Many adjustment decisions made before the file is recorded

3. Less ability to improve or do any substantial work with the image.

4. Sort of like having your hands tied.

Disadvantages of RAW

1. Large files (a file from a Nikon d800 can be 36 mb)

2. Needs a RAQ converter (Not really a problem usually it comes with the camera and all good     editing software has one ex. Photoshop has Adobe Camera RAW (aka. ACR)

3. A jpeg will “look” better before processing

Some people save in both formats but usually it’s a waste of time and disk space. Adobe has produced an open-source RAW format called Digital Negative (.dng) this is independent of the camera and the company and does not require special coding to convert. More and more camera companies like Leica are using it.Nikon (.nef) and Canon (.CR2) are their own. and it is comparable with most software.

Next week: Why are they looking at the back of their camera?

[Images from the Id] – A little planning goes along way or it’s the Holiday Season.

1 Star2 Stars3 Stars4 Stars5 Stars (No Ratings Yet)
Loading...

Images from the Id: A little planning goes along way or it’s the Holiday Season.

Jack-001

Last week, we were talking about exposure. What does that has to do with the Holidays and planning? One of the most important parts of the exposure triangle is the f-stop or aperture. Learn to use it and you will experience significant growth  in your ability to create your vision. This is why advanced photographers always set their camera mode to A for Aperture Mode or even M for Manual Mode. P or Programmed Mode can be usable but more complex. Why all this trouble? It has to do with focus. There is a property of any instrument that produces an image called Depth of Field. If there is one thing you learn to use correctly this is it. Depth of Field is the distance (or depth) of the image, foreground to background that is in focus and it must be controllable and controlled.  The smaller the aperture (Bigger number – Remember it’s a fraction and bigger denominators mean smaller numbers) mean greater depth of field. DON’T forget that. The problem with a typical point and shot camera is there is very little control of the depth of field. It drives me nuts because that is the first thing I try to do. Now my iPhone like most Smart Phones has no control because it has a huge depth of field  because its lens focal length is extremely short. It is an advantage for that type of photography.

Rules

1 – Get the camera out of Automatic and into A (Aperture) so you can select the aperture

2 – Learn to control Depth of Field with the f-stop. The greater the f-stop the greater the Depth of Field.

3 – Keep the exposure you want by observing the Exposure Triangle (Last week)

4 – Change the “normal” exposure to create your vision


A modern camera will select the exposure by comparing what the camera sees with a tiny computer perception of what it is. Usually this is a decent average but not necessarily what you want. Change that to get the depth of field you want then look for the expose you want.

Holiday shots can be more creative if you try some different ideas. Example, use a lower view point, kiddingly called getting down. Try a low shot of the turkey with the camera close to the bird and the family around the table. The bird will look very big and with a small aperture (big f-stop number) like f-18+ and everything in focus. This is one place where the smart phone may out do a point and shot. Now how about a picture of the turkey with the background out of focus. Hint – large aperture (small f-stop number). Get the idea? Impossible with the smart phone. This is one of the highest priorities in good photography.


Exposure – This is a little more difficult but learn how to override the camera’s exposure choice. Most of the time this is a button marked +/-, somewhere on the top of the camera. This is why most pros and advanced amateurs use the Manual Mode. In the Manual Mode you ca easily see the camera’s choice and adjust it to want you want. I find this is good for many situations but not for fast shooting, such as wildlife.

If you want something moody cut down on the exposure. Snow sense might need a little more exposure for white snow. Next week: So all this is interesting but who do I judge exposure or Why are those guys always looking at the back of their camera?

[Images from the Id] – Or Do I Need a New Title

1 Star2 Stars3 Stars4 Stars5 Stars (No Ratings Yet)
Loading...

Images from the Id: Or do I need a new title?

Award winner from the Albuquerque Aquarium

Award winner from the Albuquerque Aquarium

During this last week, I have been doing some research. The term id may or may not fit for this blog. Originally, my thinking came from a line in one the greatest “real” Science Fiction films ever made, Forbidden Planet (1956). Dr Morbius (Walter Pidgeon) lay dying after his subconscious, with the help of the Krell machines, created a perfectly horrible monster. In a final  line (delivered to Commander Adams-a young Leslie Nielsen), realizing his place in the massacre, he calls them “Monsters from the Id” The term seems to have a very negative connotation of monsters, unrepressed urges and uncontrolled results. This is not really what I expect for you to find here. You should learn control not chaos. So I’ll keep the name with that understanding just because I like it.

So what about equipment? It is actually very easy, the equipment you use should match your vision and how much control you need of your image. Enough? Well, maybe not. Let’s look at what you need to know and what you want to do and how that affects your choice of camera.

Light, light, light – that is what it is all about. How do you control the light? Think of a triangle. There are three point on the triangle and there are three things you must always be aware of when interpreting what is called exposure. Some of you may know this but bear with me, you may learn something new.

The first point is the ISO (in the old days it was called ASA). The ISO represents the setting of how fast the sensor collects light. Traditionally, not too modern, below 100 was considered SLOW and over 400 was FAST. Now we use the terms LOW and HIGH. High lets you take images in, surprisingly, low light. But it has a draw back. When a high ISO is used certain problems are caused by, for lack, of a better explanation, the BIG Bang and how the physics of the Universe work. This is called noise and it shows up as dotting of the image, decreasing sharpness (subject for the future). Many modern cameras do a good job improving the noise. (another future subject). Remember this, doubling the ISO doubles the amount of light collected and halving it halves the amount of light.

Second point of the triangle is the shutter speed. This is expressed in fractions of a second. It is the easiest to understand. Remember, if the shutter speed is doubled the amount of light is doubled and vise-versa, so 1/250 gets twice as much light as 1/500.

Third point is aperture or better called f-stop. This one can be confusing, f-stop is actually a ratio of the lens opening (aperture ;-)) and the focal length of the lens. Because it is a ratio, the f-stop such as f-16 should correctly be expressed as 1/16. What does that mean? Well, if the f-stop number doubles the amount of light is halved, it is a ratio. So f-16 is twice as fast as f-32. Remember that.

This all means that the three are interlinked by their nature. Let’s say, you have a correct exposure for a scene of ISO-100, Shutter Speed 1/250 and an Aperture (f-stop) of f-8, but your subject is moving and the shutter speed is too slow, you need 1/500. Since you have doubled the shutter speed (half the light) then you must double one of the others to keep the same exposure. Aperture to f-4, remember smaller means more here, OR (not both) double the ISO to 200. This is the way to keep that exposure.

So what do you need to control the light? An adjustable camera. Pros and advanced amateurs want  controls on-camera and we pay for it. We require fast and easy adjustment for each. Consumer level adjustable cameras, in most cases, require going through various menus to make the adjustments. This is a pain and awkward but the only choice for many cameras. Either way, learn your system and practice it. If you buy a new  camera consider on the body easy controls, usually worth the extra cost. This is the weakness of point and shoot and smart phone cameras, most have little or no control of exposure. Phew, got that out of the way.

Automated processing is another problem and another subject.

Next Week – A Little Planing Goes a Long Way


[Images from the Id] Photographic Vision

1 Star2 Stars3 Stars4 Stars5 Stars (No Ratings Yet)
Loading...

Images from the Id-Photographic Vision

Ghost Ride

Image Title- Ghost Ride on a Carousel – Santa Monica Pier

A few days ago, I was walking through the Plaza in Santa Fe considering writing this blog and a couple stepped up, each with their own iPad, and took a picture. Is there really a difference between my images, we don’t say pictures anymore, and their’s? My thousands-of-dollars of equipment and their multitaskers? It might be more or maybe less than you think. What is a photograph? Why are we photographers?

I need to make a few assumptions about us photographers. First, we have some desire to take better pictures (I like pictures here better than images). Second, we are motivated to improve. OK, maybe some of us are more “driven” than others. Third, we all think of equipment as being the most important part and we are all wrong, or mostly wrong

As for equipment. To quote Bill Murray (Meatballs 1979) “It doesn’t really matter” or does it?

The most important piece of equipment is the mind of a photographer:

It’s the mind that really counts- your mind and not anyone else’s mind. Hopefully, we all have one but do we know how to use it “like a photographer”?  Most minds start out as unperceptive, little lumps of white and gray matter that act a little like a sponge and start soaking up all that is good and bad around them. That is why my definition of mind includes the sensory connections to the world. As a prospective photographer, we must train the mind to see things differently. Minds, following the Law of Entropy, would rather learn bad things not good and they don’t like being told what to do. Think about (Did I say that?). So get your ducks in a row or duck in a row, sort of like clapping with one hand? Is that why we would snap our fingers in the 60’s? BOT (back on topic). Vision is the most important and you can train your Id, sub-conscience.

You have probably noticed that my mind is it goes anywhere it wants. I have little control but that is actually good when thinking like a photographer. That’s the point. Shoot differently, shoot to show others your perception of the Universe. It makes no difference what camera you are using if you don’t “see” the shot. Learn to look at angle perspective light, what can be called composition. At this point might expect information about following “The Rules”.  Rules make good images. Knowing when to break the rules can make great images. Yes we’ll talk about rules, learn them well  and when to break them.

Your “Vision” is different and not not well understood by others. It includes part of your soul and who you are. Remember you are not what other think your are. It is your difficulty to communicate yourself in your images. Everything you work on is to show that Vision.

Next  the other equipment and how it relates to your “vision”