Rss

Been & Going

[Images from the Id] – The County Fair # 2 or around and around we go

1 Star2 Stars3 Stars4 Stars5 Stars (No Ratings Yet)
Loading...

Images from the Id – The County Fair # 2 or around and around we go

Actually this could be any time there is a carnival and carnival rides. The upside says a lot of color and action with many chances to be creative. There are people and the possibility of fun night shots. People and midway shots are best later in the afternoon. Be prepared by controlling your camera for the situation. The camera should not dictate or limit your creativity. The after dark photography, when the all of the lights come on, is some of the most fun and challenging work you can do. As always practice, take a lot of images and learn from your successes. There is no such thing as a failure only a step toward success. You want to work toward that picture you have in your mind and what you want others to see. We call that “vision”.  Turn off the in-camera noise correction. Use software and shoot RAW of course. These images all require extensive exposure, saturation, contrast work in the computer. Use a tripod.

Carnival-001

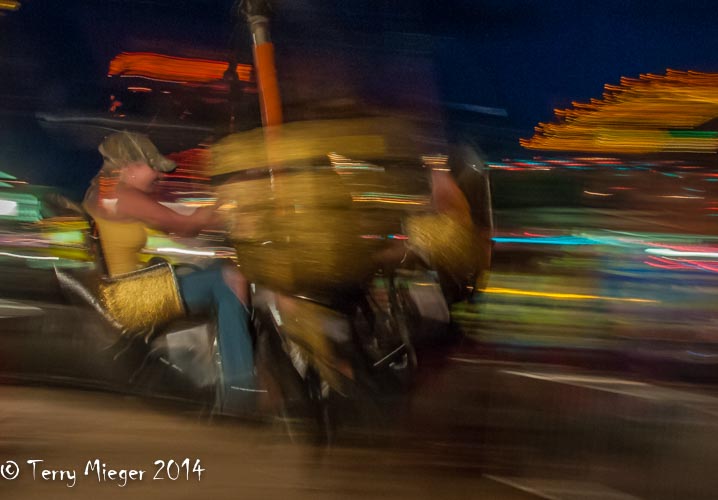
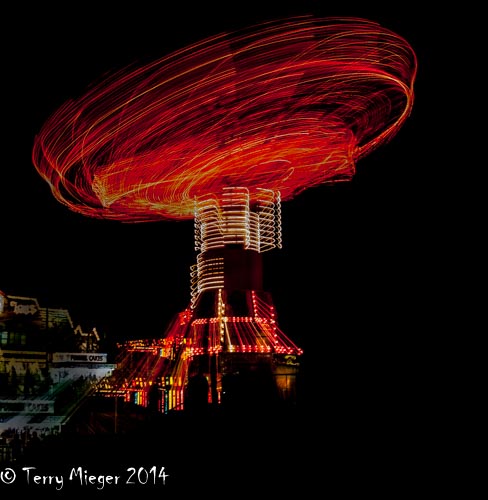
This is a simple motion shot. Slow shutter to show motion 1/4 sec  (For the motion) , f/22( for depth of Field), -1 EV (these scenes  are brighter than you think) ISO 800 (needed for the f/22), 22 mm/33 mm (pretty wide)

Carnival-002


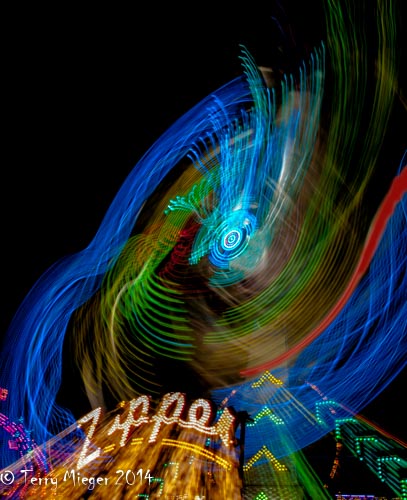
Something different , Three exposures (done in camera-I love these newer cameras), zoom during the second and third exposures. Each exposure was 4 sec (the camera automatically compensates for the exposure overlap) f/32 (actually needed to get the long exposure), ISO 200

Carnival-003


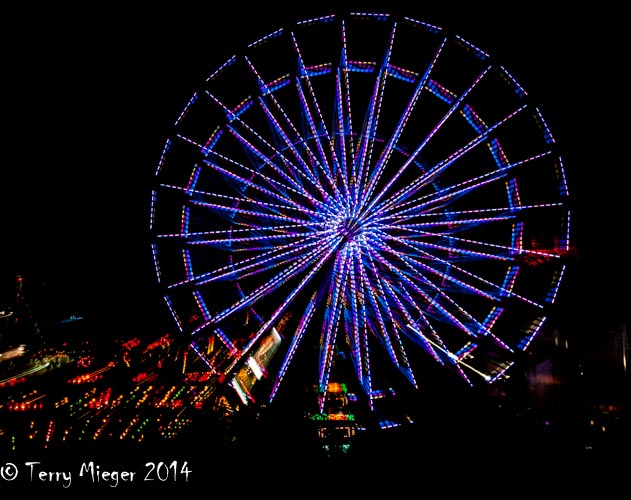
This image takes advantage of the repetitive motion of the Ferris Wheel.  Multiple exposures without zooming. Each image 4.0 sec (in this case to replicate the pattern), f/32 (again to get the long exposure) 0 EV, ISO 200 (this is optimum for this camera), 50 mm/75 mm

Carnival-004


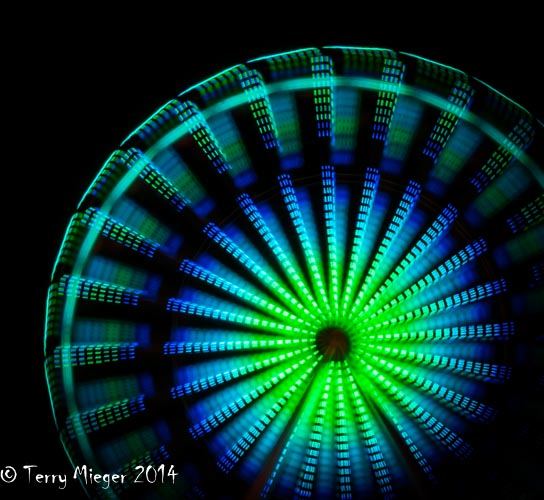
This is simply zooming during the single long exposure. Remember all of these require a lot of work on the exposure, contrast etc. 4.0 sec, f/32, 0 ev, 50 mm/75mm ISO 200

Carnival-005


This one was another multiple exposure (2) each with a long shutter speed but waiting for the ride to tilt during the time between exposures.  3.0 sec, f/11, + 1/2 EV ( I have no idea why), ISO 200, 27 mm/40 mm

Have fun

[Images from the Id] – The County Fair

1 Star2 Stars3 Stars4 Stars5 Stars (No Ratings Yet)
Loading...

Images from the Id – The County Fair

County Fairs are one of the best places to photograph. Where else can you get fireworks (Hum, done that), lots of interesting people, activities and the carnival rides.

So let’s go:

Equipment for the trip

Adjustable camera – DSLR is the best just make sure you know how to adjust the exposure settings. You will be shooting in a great number of different lighting conditions and for different effects.

Lens/Lenses –  I like my 18 mm to 200 mm for this. Vibration reduction/image stabilization  can be very helpful. A longer telephoto will be useful for some of the activities (see Mutton Busting below).

Tripod – Hopefully you will have one that is easy to carry or park near the venue so you can go back to the car to get the tripod when you need it in the later afternoon and evening. One year I forgot to put the tripod mount on the camera and actually got some decent handheld fireworks shots.

That is all you need for a great variety of shots.

The Shoot –

I entered the Fair at 2 pm.  I had previously purchased tickets online to save about $4 per ticket. I had also checked the fair’s schedule to find which activities I wanted to photograph. This year, I had some very good choices. Fairs are amazing- you might see rodeos, tractor pulls, demolition derbies, along with the regular fair exhibits, animals, carnival rides and fireworks. I decided on a trained jumping dog act and the Mutton Busters where young kids ride sheep. No need to use a tripod for those. Later in the afternoon and as the light gets darker, I went for the carnival for people shots and the rides and, at last, the fireworks without the city light pollution. As the light goes down the tripod came out. This is a very full day.  Our first stop was the barns and I got a fun shot of a goat eating its Blue Ribbon. Other good opportunities would include interaction of kids and animals. I always like the hugs and kisses. Watch the exposure. The barns can be surprisingly dark.

Next to the jumping dogs. These shots are an exercise in motion. Try stopping the jumps at high points or inverted with fast shutter speed. More challenging is to use slower shutter speed to show motion with panning or blurring.

The Mutton Busters are really fun. Nothing like cute little boys and girls trying to ride sheep. Everything you can imagine can happen. Get down low. Watch your exposure because the depth of field can be tricky. You want the whole sheep and rider in focus. I use my 80 mm – 400 mm Telephoto for this. Plan on taking a lot of shots and try to get some of when the ride and mount separate.

Next week more at the fair.

Oink-001

I’m sorry I like pigs, “Oink” 1/90 sec, ISO 400, -! EV, f/5.6, 80 mm/120 mm equivalent.

Mutton Buster-001


From the Mutton Busters fun. “Ohhhhh!” A similar shot won first place the Fair’s Photography Competition  two years ago. 1/1000 sec, 0 EV, f/6.3, ISO 200, 130 mm/195 mm  equivalent

[Images from the Id] So you want great fireworks images? Try this

1 Star2 Stars3 Stars4 Stars5 Stars (No Ratings Yet)
Loading...

So you want great fireworks images? Try this

  1. Turn your flash off, Did I have to say that?
  2. Use a Tripod.
  3. Shoot RAW if you can. This allows a greater range of adjustment of exposure
  4. Use Manual Exposure mode
    1. Automatic Exposure will always overexpose.
      1. If you use automatic, the sky will be neutral gray with no color and the fireworks blown out with no detail.
    2. Adjust the Shutter Speed for the length on the trails on the fireworks. This is the base adjustment, aperture and ISO should be varied.
      1. Use a remote release. Watch the trails of the fireworks and use “Bulb” and time your shutter that way or you can vary the camera shutter setting for different results. The trails are easy to expose because they are moving and bright. Remember the longer the shutter speed the longer the trails.
    3. Adjust the aperture for the brightness of the fireworks. They are very bright.
      1. Take test shots.
      2. Look for color with the least highlights blowout. There will alway be some.
      3. There is a tendency to overexpose. Work for colorful fireworks.
  5. ISO will not to be high. Example using ISO 200, 2 sec, f 16 is the same exposure as 2 sec, f 8, ISO 100. Lower ISO is better.
    1. Think about what changing any of the settings mean.
      1. Keep in mind the Exposure Triangle and what happens to one when you change the other) Remember the shutter speed is for the length of the trails.
  6. Turn the in-camera noise reduction off. This shortens time between exposures. Do noise reduction in software.
  7. Experiment with zooming, moving the camera or changing the focus. Be creative to make your images unique. Do some hand held for interesting effects.
  8. Check out the exposure values on the examples. Have fun

Fireworks 2-001

“Burst” – 5.0 sec, f/11, ISO 100, 75 mm Adjusted Lightroom for contrast to get back sky and color


Fireworks-002

“The Show” – 2 sec, f/8.0, ISO 800, 22 mm/33mm full frame equivalent, This was handheld at 2 sec WOW adjusted in Lightroom for sky and color

Fireworks-003

“Night Flower” – 5.0 sec, f/29, ISO 100, 70 mm. This is an award winner. The long 5 sec exposure makes it special. Adjusted in Lightroom fro color and contrast

Fireworks-001

“Starry, Starry Night” Another award winner.  1/8 sec, f/8.0, ISO 200, 55 mm/ 82mm full frame equivalent. Adjusted in Lightroom for contrast and color


[Images from the Id] – One in 5 Million or What Makes My Shot Better?

1 Star2 Stars3 Stars4 Stars5 Stars (No Ratings Yet)
Loading...

Images from the Id –  One in 5 Million or What Makes My Shot Better?

Every year the Grand Canyon has more than 5 million visitors and if you assume an average of 10 photographs per person that means 50 million images of the national park are taken each year. So how can yours be special and different?

Canyon 1-001


Sunset with rich saturated colors from the especial light. An HDR of 5 images done in Photomatix Pro. Shutter form 1.5 sec to 1/3 sec F/22 ( don’t vary in HDR) 0 EV, 100 ISO

First: The light is the most important. Plan for at least one sunrise and one sunset. Your best light, as I say many times, is one to two hours before sunset or after sunrise. You cannot  fix this in Photoshop or anything else for many reasons. The color of the canyon is total different at other times, this is where the beautiful warm reds and oranges come from that we like so much. Really serious? Get the smartphone app “The Photographer’s Ephemeris”  I will not only tell you the time of sunrise and sunset for different dates but the location on the horizon of the Sun and Moon rising and setting. These all can be significant in picking the place on the rim to shoot from.

Second: Use a tripod- this gives much more versatility. It is important to be flexible with your exposure setting and depth of field. It also open the possibility of shooting exposure brackets for High Dynamic Range (HDR) images. These images show detail over a large range of “brightness” and sell.

Third:  Look for composition. Try using trees, bushes or structures to give a landscape a partial frame. Some times that isn’t needed just another tool

Fourth:  Look for different subjects. Try macro-landscapes, taking a telephoto image of a small part of the scene.

Fifth: Take a lot of shots and practice new techniques.

Canyon 2-001


Even noon light can work by letting us into the inner canyons HDR saves the shot. 5 images done in Photomatix Pro. Shutter form 1/30 sec to 1/500 sec F/11 ( don’t vary in HDR) +2 EV, 200 ISO

[Images from the Id] – Secrets of the Secret Garden

1 Star2 Stars3 Stars4 Stars5 Stars (No Ratings Yet)
Loading...

Images from the Id – Secrets of the Secret Garden.

Let’s talk about flowers and other things in the Garden. Everyone likes to take flower pictures and with a little education and practice you can good from the ho-hum OK shots to the impressive special image. If you want something special plan ahead. The biggest problem is the light. Light is the foundation of any image and even more so here. Noon-high sun and the shadows it throws are the enemies of good lighting in any situation. The camera can not handle the high contrast range. In most situations, this means getting up early or starting late. The best light is about 2 hours after sunrise or 2 hours before sunset. This is the “Golden Hours” and many experienced photographers will not shoot any other time if they can help it. This true for the flower shooter but there are some other situations where we can improve on nature. Equipment to bring to the garden.

1-I prefer a DSLR (Digital Single Lens Reflex camera.) I like the DX (Nikon) or APS-C (Canon) sensor because it adds 50% magnification and is easier to get good blurring of the background, both are nice for flowers.

2 – Good Macro Lens – I like the Nikkon 105 mm f/2.8. Sigma makes a similar 105 mm. There are many others. They all let you get closer to the flower and that’s good.

3 – A round, folding 22” reflector which has a black side a grey side, a diffuser, silver, gold, white and black sides. This reflector is essential. It is used to reflect light into the shadows and create a false diffuse shade. The grey side is great for setting the white balance in difficult situations (a future topic?). This  is a must item for even shooting with point and shoot cameras. You will be amazed by its simplicity and value. I use the gold reflector because it gives the early morning, warm look to the image that I like. The color of flowers looks better in the shade with a little reflected light and good white balance correction in the software. Lightroom makes this easy.

4 – Extension tubes allow any lens to focus closer. They come in sets of 3 which can be stacked in many variations and allow some choice as to what length to use.

5 – Tripod– some people use them some don’t. Sometimes when I don’t use a tripod I use a flash-next item.

6 – Flash- a ring flash is nice but don’t use your o camera flash. Better is a duo of flashes on a bracket each about 6 inches to the right and left sides of the camera. Nikon makes a nice one but this can be homemade. I saw some good results with and on camera flash set at about 20% and a second flash hand held a foot or two to the right or left. Used correctly flash can be great. Try using it to blacken, way under expose the background.

7 – Backgrounds are as import as the subject be a piece of non shinny black hobby foam, Other colors work too. Even an old photo can be cool.

This setup will work well with a  flower shot or closeups (Macro) of insects and arachnids. As usual testing and practice will get results

As always go ahead and twist the rules!

Try backlighting and or shooting from the back. Add an insect for fun. Bees are tough sots but worth all of the effort.

Fly-001

The Fly A winner in a competition for “Animals in their Environment” Backlit and direct sun but early in the day. 1/640 sec, f/5.6, 0 EV, No flash,  ISO 200, Nikkor 80mm-400 mm G lens (hum a telephoto) at 400/600 mm, Nikon D7100

Flower 1-001

Burst – Taken in the shade with white balance correction etc. 1/320 sec, f/5.6, 0 EVC, No flash, ISO 100, Nikkor 105 mm prime (not a zoom)

Sunflower-001


Sunflower – shoot something different 1/1000 sec, f/6.3, 0 EV, ISO 800, Nikkor 80mm -400 mm G Zoom again

spyder-001


Spider- Something to do when you are tried of orchids. Another winner.  1/180 sec. f/13 (needed depth of field bad)  0 EV, No flash, ISO 800, Nikkor 105 mm Macro, 105 mm/157 mm Nikon D300. This is an extreme crop yet still worked well. It was about  1/4 inch long. At the LA Arboretum.


[Images from the Id] – To the Zoo, Zoo, Zoo how about you?

1 Star2 Stars3 Stars4 Stars5 Stars (No Ratings Yet)
Loading...

Images from the Id – To the Zoo, Zoo, Zoo how about you?

The next stop was the San Diego Zoo and its world famous collections. Zoos cause mixed feelings for me  Seeing confined species after species in conditions which, in most cases, are far from their natural environment. I majored in Zoology, which should be pronounced differently and really has nothing to do with confining animals. Now, I understand the important part the zoo is playing in the preservation of species and the growth of human affection and positive attitudes toward animals. I think it doesn’t help some of the animals that need it the most. Bats, snakes and others don’t get the press of a cute baby Giraffe. Well, I have this buddy who’s taking a trip to Tanzania next April (actually 2 trips) and it’s only $10,000. Let’s see for my wife and maybe a new mortgage would work? Ha, not in this life. The kicker is I have other friends who will go with him and he will have no problem filling in the trips. For the rest of us, there are zoos. We won’t get the natural environment or natural behavior but we have our imagination. When I was younger I loved zoos because I was and still am fascinated by animals especial the strange, weird or rare. I will never see a Tuatara (look it up) in wild New Zealand but I have seen several in a conservation site in Invercargill, Southland NZ. Where can you see Great Pandas? (More on that later) I am in my glory in the Reptile House. A positive note: most larger zoos are converting to more natural habitats which are better for the animals and photographers

Zoo photography starts with the right zoo and all zoos are not create equal in the eyes of the photographer. Of the four zoos I have photographed I would, in terms of photographing, rank the Albuquerque Zoo first. It is a comparatively new zoo and most is accessible without a lot of wire screens or bars. They do need to re-think how the  in zoo transportation runs. It is located in a Bio-Park with the Aquarium and Botanical Gardens which are both great photography. Atlanta comes in second for the accessibility to the Great Pandas and red elephants (from the Georgia clay). San Diego is third because of the inaccessibility of the Great Pandas, the miles of climbing the terrain and a lot of it is still the old style cages. A good point for SD is the easy to “shoot” Koalas and a decent and photo-friendly Reptile House (not great but better than other zoos-more light). Last is my home town Denver. Every time they do something they get more wire or netting. It can be frustrating. They have a new Africa area and it’s not very natural or photogenic. I forgot The St. Augustine Alligator Farm and Zoological Park. It is a whole different category. No wire or nets around the main attractions , alligators and in the spring the totally natural rookery is fantastic for the Roseate Spoonbills and other large Florida birds.

Panda-001

Featured Image: Giant Panda Atlanta Zoo 1/320 sec; f/9.0; 200 mm/300 mm; ISO 800; EV 0  Atlanta is the best place (outside of China?) to photograph Giant PandaNext week Shooting the zoo and making the best of the situation

mangabeys-001

The rare Mangabey San Diego Zoo; 1/180 sec.; f/5.6; EV0, ISO 800; 400 mm/600mm Of interest  because of its being rare which is a strength of San Diego.


[Images from the Id] – Surfin’ Safari or on the Beach?

1 Star2 Stars3 Stars4 Stars5 Stars (No Ratings Yet)
Loading...


When I'm 64-001

Images from the Id – Surfin’ Safari or on the Beach?

North of the Birch Aquarium is the Cardiff State Beach. Not a particularly unique beach but fun for an inlander. Beach photography can be interesting because of the people and flotsam stranded on the beach. The people can range from surfers and sun bathers to gawking photographers 😉 It’s a joy just walking the edge of the water and trying not to get too wet, then an unusually high wave spoils your attempts.

It is very important to understand the damage salt and saltwater can do to a camera and lens. Always have a UV or Skylight filter on the lens, most of us do that anyway. Second be sure to wipe your equipment carefully with a fresh water dampened cloth to remove any salt etc. from the environment. You really don’t need more than one lens a good zoom such as my 80 mm – 400 mm is perfect even for closeups and debris. What to shot? Less obviously, look at somethings that are different such as; a line up of colorful surfboards, unusual arrangement of kelp etc. Look for colors, textures, repetitive forms or lines. Action is easier to find and can be great fun. The bikini clad girl playing impromptu volleyball is always fun. Then there are the surfers. Use your longest lens and a fast shutter to capture the action and try the slower shutter for showing motion, which is much more difficult. Look iconic positions and flying boards. As you know by now you will have to balance the exposure triangle (ISO-Aperture-Shutter Speed) toward shutter Speed. In fact, you may want to use “Shutter Priority”. Shot suffers with a fast shutter release, 6 frames per second or faster to get great sequences.

Have fun get your feet wet

Featured Image “When I’m 64” thanks to my wife for the title. This gal was 64. 1/1500 sec., f/6.7 (comment I prefer not to shot with the lens wide open if I have the choice. The smaller f-stops are sharper up to about f/16), 0 EV, ISO 200, 165 mm/247 mm. focal length. Processed in Lightroom 5.4.

Surfing-001

Surfing-002


Surfing-003

“Oops” three images of a ten shot sequence, 1/1500 sec., f/6.7, 0 EV, ISO 200, 400 mm/600 mm focal length.


[Images from the Id] On the Road Or Swimmin’ in the Tank?

1 Star2 Stars3 Stars4 Stars5 Stars (No Ratings Yet)
Loading...

Images from the Id – On the Road Or Swimmin’ in the Tank?

As of today we have been on the road for 10 days for a combination family visit and photography trip. Photography-wise the first stop was the Birch Aquarium in La Jolla California. This is a nice, although small aquarium that we have visited for many years. This is tough photography. It’s dark, the glass is not always clear and it’s usually wavy. Focusing is difficult and it seems like many times the iPhone gets a better image. The day we were there the were large groups of school field-trippers and pushy toddlers. My usual philosophy is, they have as much right to look and enjoy the facility as I do.   All of these factors influence the ability to get good photographs.

Preparation for a trip to the aquarium. First, look at taking the correct equipment, pick what you will need for the purpose you hope to accomplish. I will usually be looking for the great fish and animal shots but I really like to throw in some “people” shots.. You need to be aware that every public aquarium, zoo or gardens has strict policies governing the use of photographs taken. You must not use any of the images for income unless you pay their fee, which can be quite high. So just use them for your self. If you have a family plan to use the aquarium more as a back drop your activity.

Equipment- most modern cameras handle low light well, some better than others. Use one that does well in low light, higher ISO settings. Take the fastest lens you can. By this I mean one that has a maximum f stop of at least f/2.8. Remember the smaller the number the more the light can get to the sensor. We call this “faster”. The lens should have good vibration reduction (VR on Nikon). Here’s a side note- contrary to what you may have heard, lens stabilization is much better than stabilization in the cameras body. Yes, having stabilization in the camera-body does work with all lenses but having it in the lens has one major advantage, you can actually see it work. I was shooting today and actually could see I forgot to turn the VR on. Back on subject. A good stabilization allows you to shoot at much lower shutter speed. Forget the flash. Most of the time the flash will give nothing but reflections which are a major problem anyway. Using a polarizer would be nice but not practical because of the decrease in light. Learn, I should say practice, good shutter release techniques. You must learn to squeeze the “trigger” Try taking a breath and holding it. You will be amazed how slow of a shutter speed you can handle with stabilization and practice.

At the aquarium, keep checking your settings. Shoot aperture priority, keeping the lens as open as you can considering the depth of field. Your camera should be able to automatically handle the exposure. Shoot RAW. This allows you to “fudge” the exposure a bit to help your shutter speed. You may have to do some manual focusing and that can be difficult. Practice gets better results.

Try shooting something besides just the fish put some people in, especially if they’re family. The people help keep the frustration down and add to your experience and repertoire. Experiment,  have fun this should help you to get started and you will get some great results.

Sea Dragon-001

Lead Photo – Birch Aquarium La Jolla CA. Sea Dragon, 1/125 sec, f/5.0, -1.0 EV, 3200 ISO!! This d7100 Nikon is great for lower noise at these high ISOs. You also need good noise reduction is this case Lightroom 5.4

Shark-001

Photo #2 Atlanta Aquarium is a great place to photograph fish and people. 1/125 sec, f/5.6, -1 1/3 EV (don’t be afraid of playing with EV) ISO 800 18 mm/27 mm.


[Images from the Id] – What do you do with 100,000 images or What’s a Lightroom?

1 Star2 Stars3 Stars4 Stars5 Stars (No Ratings Yet)
Loading...

Images from the Id – What do you do with 100,000 images or What’s a Lightroom?

Years ago photography was quite different for me. First I was young I had very limited income. In fact when I first started with a camera I was earning $1.10 an hour and that was pretty good part time summer work. Kodachrome, my favorite, was a couple of bucks for 36 shots. I used to count images by the dollar. My how life has changed ( I wonder who was the first one to say that). Digital has been a revolution. In fact I will use another cliche. Join the parade or get out of the way. Yea, I know maybe two people who still use film and they can do fantastic work but us everyday people who don’t like to work to hard and are cheap, (translation- use or monetary funds on equipment not film), digital  is the only way. Another factor, the actual quality of the images has gone though the skylight because of the availability of “reasonable” software and images that cost zero to record. This then leads to the obvious result of “spray and pray” shooting. Many wildlife photographers, including yours truly, set their camera to the fast number of shots per second and spray away. To tell the truth, the reason is not to get a good quality image but to get the image at all. What I mean is, thanks to the new digital cameras, images have the correct exposure (to stop the motion), aperture (for the depth of field you want), and white balance (for the correct color rendition).  The challenge for the photographer is to get the “pose” or the “action”.

Last Friday, I went to a a local wetland/park looking for some wadding birds. The advantage of this locale is you can get close to feeding egrets and heron, not easy in Colorado. Not a wadder in sight but the resourceful shooter can usually come up with something. I got Western Painted Turtles.  I have two purposes with this example. First- get the pose, and second- to show that this was done by taking over 200 images, and that was on a bad day! More about the pose later. What do you do with 200 images? How do you cull the junk out? What is the easiest way to process them? Remember one of the disadvantages of raw images is that each must be individually processed. Adobe Lightroom organizes processes and much more. I would never be able to find let alone work on an image without it. I will keep coming back to this in other entries.

Painted Turtle-001

This week’s image: Western Painted Turtle “Saying Hello”: Not much was going on with the birds so we worked on the turtles. This is one of about 40 shots and the only one of any competitive value. If you take enough shots eventually you will see the pose you want – 1/350 sec, f/5.6, 0 EV, ISO 140, 400 mm/ 600 mm