Images from the Id – Close Encounters of the Moose Kind Part 2 or Exposure and Dynamic Range
Success at any wildlife shoot involves preparation and practice. You must know your equipment and be ready to put all of that knowledge into rapid use. Practice involves shooting frame after frame of non-interesting subjects. In my case, a lot of gulls and what birders call white-faced geese, most of which are Canada Geese. Ok, so some of those images have done well and even won awards but it can be great practice. In the case of these moose, the skills needed were quite simple. It’s important to take a lot of shots searching for the perfect image. Getting the camera adjustments correct the first time in difficult lighting and fast shooting conditions- that takes practice.
A modern camera doesn’t necessarily get the exposure of a dark moose on the lighter background of the sky or water correct. Learn to set your camera for the result you want in the end. A pro shoots in manual so quick changes in exposure can be made based upon experience and comparing that with the camera’s choice. The learning curve is high but once learned the results can be quick and accurate. You can start by using the Exposure Compensation button on the camera and using it to raise or lower the choice of the camera. Practice before you need it. Use it to over expose dark subjects on light bright backgrounds such as birds flying across the sky. Or to under expose light subjects on dark background. The camera wants to average everything to neutral gray. Another place you may want to increase the exposure is in snow. Cameras generally like snow gray and not white.
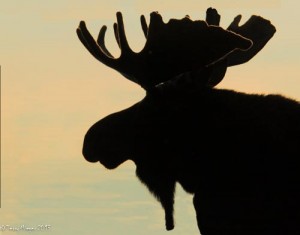
I remind you. Shot in RAW. Shooting images in RAW format does require a little more processing in the end and a little more disc space for the larger files and most of the time they don’t look as good as the jpg file but having a RAW file, increases your ability to adjust the image to a much greater extent especially in the White Balance, and Dynamic Range (which is the detail in the light and dark areas of the image). In the case of my cover image this week having the RAW image made all of the difference between getting a usable image and being limited to a limited result. The biggest problem with shooting jpg is you will never know what you have lost. I cannot accept that limitation- just shoot RAW and get a bigger hard drive, they are actually pretty cheap. By the way, some cameras allow you to shoot both Raw and jpg simultaneously. Don’t waste time and file space by shooting both, there is no advantage in that.
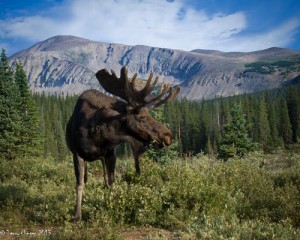
The story of the image: I had crossed the road to the willows surrounding the lake on our second trip. It was about 7:30 in the morning and sun was low in the East. Moose were everywhere. I counted nine sets of antlers above the low brush. The adreniline peaked and anticipation drove us into the willows. There were no cows. As it turns out that was probably a significant factor along with it being mid-August contributing to their being docile. This meant moose hormones were at a low. The antlers were in late velvet and they would be shed during the rut in the fall. The location was no longer a secret and the willows were filled with photographers. I headed for the lake, while my shooting partner (my wife) headed for high ground of one of the low hills in the brush. Approaching the lake, I saw a moose drinking and a photographer shooting. First thought, why am I always 5 seconds late? Ok, that’s not always true because I do get more than my share of “the” shots but when you miss one, you still think that. I had no time to think and adjust for exposure. The moose was to the East and the sun was to the East. It was all wrong for my setup and no time to correct, the moose had already raised his head. I Had both the D300 and D5100 prepared and had the 18-200 mm lens on the D300. Effectively a 300 mm. (remember DX?) Distance was no problem but the light was another story. I got off one shot with the D300 before the composition was gone.
Turns out the camera settings were way off ISO 800, no need for that speed. Exposure compensation -2/3, What in the hell was it doing set less and not more for shadow detail? A lesson learned. Shutter speed 1/8000 sec. no need for that speed either. Aperture f-5.6, how far off can you get? This combination is way out of whack for the situation. If I could have the time I would have done: ISO 200 (less noise), Exposure compensation +1 (for the shadows), shutter speed about 1/500 sec, aperture f-8 (a sharper choice) and a quick look at the histogram. It’s too late when it’s over. (that sounds just like a Yogi-ism).
So what did I get, a great silhouette. It took a little work in Lightroom and Photoshop to bring out the color in the background and emphasize the glow of the velvet around the antlers. I like it a lot but… Next week; Close Encounters of the Moose Kind Part 3 or So What is Wrong with this Picture?


