Rss

Been & Going

[Images from the Id] – One in 5 Million or What Makes My Shot Better?

1 Star2 Stars3 Stars4 Stars5 Stars (No Ratings Yet)
Loading...

Images from the Id –  One in 5 Million or What Makes My Shot Better?

Every year the Grand Canyon has more than 5 million visitors and if you assume an average of 10 photographs per person that means 50 million images of the national park are taken each year. So how can yours be special and different?

Canyon 1-001


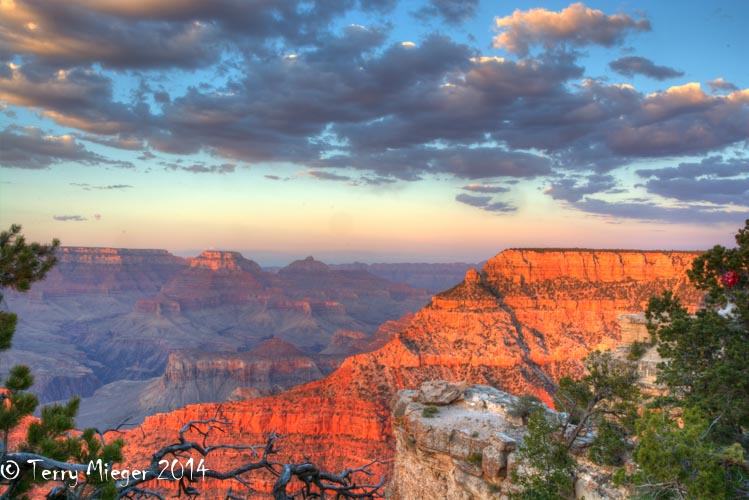
Sunset with rich saturated colors from the especial light. An HDR of 5 images done in Photomatix Pro. Shutter form 1.5 sec to 1/3 sec F/22 ( don’t vary in HDR) 0 EV, 100 ISO

First: The light is the most important. Plan for at least one sunrise and one sunset. Your best light, as I say many times, is one to two hours before sunset or after sunrise. You cannot  fix this in Photoshop or anything else for many reasons. The color of the canyon is total different at other times, this is where the beautiful warm reds and oranges come from that we like so much. Really serious? Get the smartphone app “The Photographer’s Ephemeris”  I will not only tell you the time of sunrise and sunset for different dates but the location on the horizon of the Sun and Moon rising and setting. These all can be significant in picking the place on the rim to shoot from.

Second: Use a tripod- this gives much more versatility. It is important to be flexible with your exposure setting and depth of field. It also open the possibility of shooting exposure brackets for High Dynamic Range (HDR) images. These images show detail over a large range of “brightness” and sell.

Third:  Look for composition. Try using trees, bushes or structures to give a landscape a partial frame. Some times that isn’t needed just another tool

Fourth:  Look for different subjects. Try macro-landscapes, taking a telephoto image of a small part of the scene.

Fifth: Take a lot of shots and practice new techniques.

Canyon 2-001


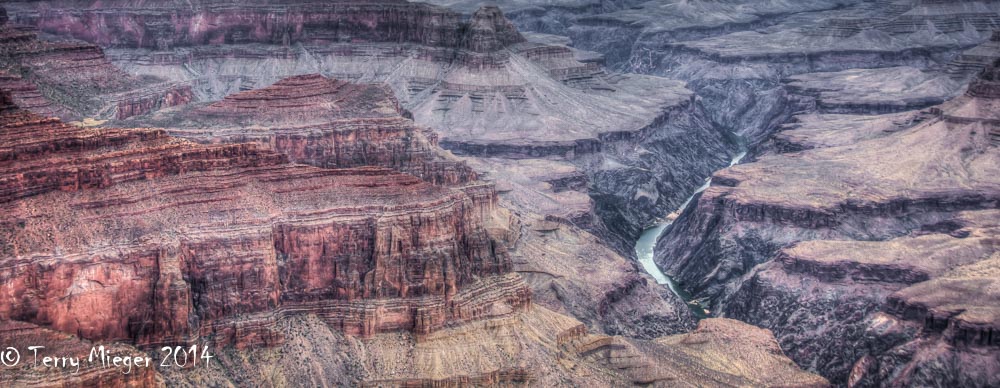
Even noon light can work by letting us into the inner canyons HDR saves the shot. 5 images done in Photomatix Pro. Shutter form 1/30 sec to 1/500 sec F/11 ( don’t vary in HDR) +2 EV, 200 ISO

[Images from the Id] – Secrets of the Secret Garden

1 Star2 Stars3 Stars4 Stars5 Stars (No Ratings Yet)
Loading...

Images from the Id – Secrets of the Secret Garden.

Let’s talk about flowers and other things in the Garden. Everyone likes to take flower pictures and with a little education and practice you can good from the ho-hum OK shots to the impressive special image. If you want something special plan ahead. The biggest problem is the light. Light is the foundation of any image and even more so here. Noon-high sun and the shadows it throws are the enemies of good lighting in any situation. The camera can not handle the high contrast range. In most situations, this means getting up early or starting late. The best light is about 2 hours after sunrise or 2 hours before sunset. This is the “Golden Hours” and many experienced photographers will not shoot any other time if they can help it. This true for the flower shooter but there are some other situations where we can improve on nature. Equipment to bring to the garden.

1-I prefer a DSLR (Digital Single Lens Reflex camera.) I like the DX (Nikon) or APS-C (Canon) sensor because it adds 50% magnification and is easier to get good blurring of the background, both are nice for flowers.

2 – Good Macro Lens – I like the Nikkon 105 mm f/2.8. Sigma makes a similar 105 mm. There are many others. They all let you get closer to the flower and that’s good.

3 – A round, folding 22” reflector which has a black side a grey side, a diffuser, silver, gold, white and black sides. This reflector is essential. It is used to reflect light into the shadows and create a false diffuse shade. The grey side is great for setting the white balance in difficult situations (a future topic?). This  is a must item for even shooting with point and shoot cameras. You will be amazed by its simplicity and value. I use the gold reflector because it gives the early morning, warm look to the image that I like. The color of flowers looks better in the shade with a little reflected light and good white balance correction in the software. Lightroom makes this easy.

4 – Extension tubes allow any lens to focus closer. They come in sets of 3 which can be stacked in many variations and allow some choice as to what length to use.

5 – Tripod– some people use them some don’t. Sometimes when I don’t use a tripod I use a flash-next item.

6 – Flash- a ring flash is nice but don’t use your o camera flash. Better is a duo of flashes on a bracket each about 6 inches to the right and left sides of the camera. Nikon makes a nice one but this can be homemade. I saw some good results with and on camera flash set at about 20% and a second flash hand held a foot or two to the right or left. Used correctly flash can be great. Try using it to blacken, way under expose the background.

7 – Backgrounds are as import as the subject be a piece of non shinny black hobby foam, Other colors work too. Even an old photo can be cool.

This setup will work well with a  flower shot or closeups (Macro) of insects and arachnids. As usual testing and practice will get results

As always go ahead and twist the rules!

Try backlighting and or shooting from the back. Add an insect for fun. Bees are tough sots but worth all of the effort.

Fly-001

The Fly A winner in a competition for “Animals in their Environment” Backlit and direct sun but early in the day. 1/640 sec, f/5.6, 0 EV, No flash,  ISO 200, Nikkor 80mm-400 mm G lens (hum a telephoto) at 400/600 mm, Nikon D7100

Flower 1-001

Burst – Taken in the shade with white balance correction etc. 1/320 sec, f/5.6, 0 EVC, No flash, ISO 100, Nikkor 105 mm prime (not a zoom)

Sunflower-001


Sunflower – shoot something different 1/1000 sec, f/6.3, 0 EV, ISO 800, Nikkor 80mm -400 mm G Zoom again

spyder-001


Spider- Something to do when you are tried of orchids. Another winner.  1/180 sec. f/13 (needed depth of field bad)  0 EV, No flash, ISO 800, Nikkor 105 mm Macro, 105 mm/157 mm Nikon D300. This is an extreme crop yet still worked well. It was about  1/4 inch long. At the LA Arboretum.


[Images from the Id] – To the Zoo, Zoo, Zoo how about you?

1 Star2 Stars3 Stars4 Stars5 Stars (No Ratings Yet)
Loading...

Images from the Id – To the Zoo, Zoo, Zoo how about you?

The next stop was the San Diego Zoo and its world famous collections. Zoos cause mixed feelings for me  Seeing confined species after species in conditions which, in most cases, are far from their natural environment. I majored in Zoology, which should be pronounced differently and really has nothing to do with confining animals. Now, I understand the important part the zoo is playing in the preservation of species and the growth of human affection and positive attitudes toward animals. I think it doesn’t help some of the animals that need it the most. Bats, snakes and others don’t get the press of a cute baby Giraffe. Well, I have this buddy who’s taking a trip to Tanzania next April (actually 2 trips) and it’s only $10,000. Let’s see for my wife and maybe a new mortgage would work? Ha, not in this life. The kicker is I have other friends who will go with him and he will have no problem filling in the trips. For the rest of us, there are zoos. We won’t get the natural environment or natural behavior but we have our imagination. When I was younger I loved zoos because I was and still am fascinated by animals especial the strange, weird or rare. I will never see a Tuatara (look it up) in wild New Zealand but I have seen several in a conservation site in Invercargill, Southland NZ. Where can you see Great Pandas? (More on that later) I am in my glory in the Reptile House. A positive note: most larger zoos are converting to more natural habitats which are better for the animals and photographers

Zoo photography starts with the right zoo and all zoos are not create equal in the eyes of the photographer. Of the four zoos I have photographed I would, in terms of photographing, rank the Albuquerque Zoo first. It is a comparatively new zoo and most is accessible without a lot of wire screens or bars. They do need to re-think how the  in zoo transportation runs. It is located in a Bio-Park with the Aquarium and Botanical Gardens which are both great photography. Atlanta comes in second for the accessibility to the Great Pandas and red elephants (from the Georgia clay). San Diego is third because of the inaccessibility of the Great Pandas, the miles of climbing the terrain and a lot of it is still the old style cages. A good point for SD is the easy to “shoot” Koalas and a decent and photo-friendly Reptile House (not great but better than other zoos-more light). Last is my home town Denver. Every time they do something they get more wire or netting. It can be frustrating. They have a new Africa area and it’s not very natural or photogenic. I forgot The St. Augustine Alligator Farm and Zoological Park. It is a whole different category. No wire or nets around the main attractions , alligators and in the spring the totally natural rookery is fantastic for the Roseate Spoonbills and other large Florida birds.

Panda-001

Featured Image: Giant Panda Atlanta Zoo 1/320 sec; f/9.0; 200 mm/300 mm; ISO 800; EV 0  Atlanta is the best place (outside of China?) to photograph Giant PandaNext week Shooting the zoo and making the best of the situation

mangabeys-001

The rare Mangabey San Diego Zoo; 1/180 sec.; f/5.6; EV0, ISO 800; 400 mm/600mm Of interest  because of its being rare which is a strength of San Diego.


[Images from the Id] – Surfin’ Safari or on the Beach?

1 Star2 Stars3 Stars4 Stars5 Stars (No Ratings Yet)
Loading...


When I'm 64-001

Images from the Id – Surfin’ Safari or on the Beach?

North of the Birch Aquarium is the Cardiff State Beach. Not a particularly unique beach but fun for an inlander. Beach photography can be interesting because of the people and flotsam stranded on the beach. The people can range from surfers and sun bathers to gawking photographers 😉 It’s a joy just walking the edge of the water and trying not to get too wet, then an unusually high wave spoils your attempts.

It is very important to understand the damage salt and saltwater can do to a camera and lens. Always have a UV or Skylight filter on the lens, most of us do that anyway. Second be sure to wipe your equipment carefully with a fresh water dampened cloth to remove any salt etc. from the environment. You really don’t need more than one lens a good zoom such as my 80 mm – 400 mm is perfect even for closeups and debris. What to shot? Less obviously, look at somethings that are different such as; a line up of colorful surfboards, unusual arrangement of kelp etc. Look for colors, textures, repetitive forms or lines. Action is easier to find and can be great fun. The bikini clad girl playing impromptu volleyball is always fun. Then there are the surfers. Use your longest lens and a fast shutter to capture the action and try the slower shutter for showing motion, which is much more difficult. Look iconic positions and flying boards. As you know by now you will have to balance the exposure triangle (ISO-Aperture-Shutter Speed) toward shutter Speed. In fact, you may want to use “Shutter Priority”. Shot suffers with a fast shutter release, 6 frames per second or faster to get great sequences.

Have fun get your feet wet

Featured Image “When I’m 64” thanks to my wife for the title. This gal was 64. 1/1500 sec., f/6.7 (comment I prefer not to shot with the lens wide open if I have the choice. The smaller f-stops are sharper up to about f/16), 0 EV, ISO 200, 165 mm/247 mm. focal length. Processed in Lightroom 5.4.

Surfing-001

Surfing-002


Surfing-003

“Oops” three images of a ten shot sequence, 1/1500 sec., f/6.7, 0 EV, ISO 200, 400 mm/600 mm focal length.


[Images from the Id] On the Road Or Swimmin’ in the Tank?

1 Star2 Stars3 Stars4 Stars5 Stars (No Ratings Yet)
Loading...

Images from the Id – On the Road Or Swimmin’ in the Tank?

As of today we have been on the road for 10 days for a combination family visit and photography trip. Photography-wise the first stop was the Birch Aquarium in La Jolla California. This is a nice, although small aquarium that we have visited for many years. This is tough photography. It’s dark, the glass is not always clear and it’s usually wavy. Focusing is difficult and it seems like many times the iPhone gets a better image. The day we were there the were large groups of school field-trippers and pushy toddlers. My usual philosophy is, they have as much right to look and enjoy the facility as I do.   All of these factors influence the ability to get good photographs.

Preparation for a trip to the aquarium. First, look at taking the correct equipment, pick what you will need for the purpose you hope to accomplish. I will usually be looking for the great fish and animal shots but I really like to throw in some “people” shots.. You need to be aware that every public aquarium, zoo or gardens has strict policies governing the use of photographs taken. You must not use any of the images for income unless you pay their fee, which can be quite high. So just use them for your self. If you have a family plan to use the aquarium more as a back drop your activity.

Equipment- most modern cameras handle low light well, some better than others. Use one that does well in low light, higher ISO settings. Take the fastest lens you can. By this I mean one that has a maximum f stop of at least f/2.8. Remember the smaller the number the more the light can get to the sensor. We call this “faster”. The lens should have good vibration reduction (VR on Nikon). Here’s a side note- contrary to what you may have heard, lens stabilization is much better than stabilization in the cameras body. Yes, having stabilization in the camera-body does work with all lenses but having it in the lens has one major advantage, you can actually see it work. I was shooting today and actually could see I forgot to turn the VR on. Back on subject. A good stabilization allows you to shoot at much lower shutter speed. Forget the flash. Most of the time the flash will give nothing but reflections which are a major problem anyway. Using a polarizer would be nice but not practical because of the decrease in light. Learn, I should say practice, good shutter release techniques. You must learn to squeeze the “trigger” Try taking a breath and holding it. You will be amazed how slow of a shutter speed you can handle with stabilization and practice.

At the aquarium, keep checking your settings. Shoot aperture priority, keeping the lens as open as you can considering the depth of field. Your camera should be able to automatically handle the exposure. Shoot RAW. This allows you to “fudge” the exposure a bit to help your shutter speed. You may have to do some manual focusing and that can be difficult. Practice gets better results.

Try shooting something besides just the fish put some people in, especially if they’re family. The people help keep the frustration down and add to your experience and repertoire. Experiment,  have fun this should help you to get started and you will get some great results.

Sea Dragon-001

Lead Photo – Birch Aquarium La Jolla CA. Sea Dragon, 1/125 sec, f/5.0, -1.0 EV, 3200 ISO!! This d7100 Nikon is great for lower noise at these high ISOs. You also need good noise reduction is this case Lightroom 5.4

Shark-001

Photo #2 Atlanta Aquarium is a great place to photograph fish and people. 1/125 sec, f/5.6, -1 1/3 EV (don’t be afraid of playing with EV) ISO 800 18 mm/27 mm.


[Images from the Id] – What do you do with 100,000 images or What’s a Lightroom?

1 Star2 Stars3 Stars4 Stars5 Stars (No Ratings Yet)
Loading...

Images from the Id – What do you do with 100,000 images or What’s a Lightroom?

Years ago photography was quite different for me. First I was young I had very limited income. In fact when I first started with a camera I was earning $1.10 an hour and that was pretty good part time summer work. Kodachrome, my favorite, was a couple of bucks for 36 shots. I used to count images by the dollar. My how life has changed ( I wonder who was the first one to say that). Digital has been a revolution. In fact I will use another cliche. Join the parade or get out of the way. Yea, I know maybe two people who still use film and they can do fantastic work but us everyday people who don’t like to work to hard and are cheap, (translation- use or monetary funds on equipment not film), digital  is the only way. Another factor, the actual quality of the images has gone though the skylight because of the availability of “reasonable” software and images that cost zero to record. This then leads to the obvious result of “spray and pray” shooting. Many wildlife photographers, including yours truly, set their camera to the fast number of shots per second and spray away. To tell the truth, the reason is not to get a good quality image but to get the image at all. What I mean is, thanks to the new digital cameras, images have the correct exposure (to stop the motion), aperture (for the depth of field you want), and white balance (for the correct color rendition).  The challenge for the photographer is to get the “pose” or the “action”.

Last Friday, I went to a a local wetland/park looking for some wadding birds. The advantage of this locale is you can get close to feeding egrets and heron, not easy in Colorado. Not a wadder in sight but the resourceful shooter can usually come up with something. I got Western Painted Turtles.  I have two purposes with this example. First- get the pose, and second- to show that this was done by taking over 200 images, and that was on a bad day! More about the pose later. What do you do with 200 images? How do you cull the junk out? What is the easiest way to process them? Remember one of the disadvantages of raw images is that each must be individually processed. Adobe Lightroom organizes processes and much more. I would never be able to find let alone work on an image without it. I will keep coming back to this in other entries.

Painted Turtle-001

This week’s image: Western Painted Turtle “Saying Hello”: Not much was going on with the birds so we worked on the turtles. This is one of about 40 shots and the only one of any competitive value. If you take enough shots eventually you will see the pose you want – 1/350 sec, f/5.6, 0 EV, ISO 140, 400 mm/ 600 mm


[Images from the Id] Ok, It’s Time to Organize or How Stupid Can a Smart Guy Be?

1 Star2 Stars3 Stars4 Stars5 Stars (No Ratings Yet)
Loading...

Images from the Id – Ok, It’s Time to Organize or How Stupid Can a Smart Guy Be?

Sometimes I get myself into things. I know it’s my own fault but I just can’t help it. It’s sort of like a Greek Tragedy (should that be caps?), where the hero crashes because of a flaw in his character. Not to say I have a flaw or even character. You be the judge, I have given up. An insatiable, relentless and consuming curiosity drives my life. I have to know how everything works and one step farther, why, and worse- I have to tell everyone else about even if they really don’t care.

This week I have been doing something I never thought I would ever do. I never thought I would be a writer, or a public speaker, just ask my past teachers who gave me “Cs” out of kindness and in an attempt to get rid of me. These last two weeks I have done two 1-2 hour presentations, a 10 minute impromptu one and written three segments of an introduction to Photoshop workshop this Saturday. Preparing images for three monthly competitions add to the fun. It’s getting so my wait to the last minute disorganization will no longer fly. Educational/technical writing is much more difficult than imagined. Put together with being President of two camera clubs, actually one is a confederation of four clubs, sometimes I just sit like a zombie in the Lazy-boy chair and stare into the distance. I don’t feel it is stressful but someday it may all come crashing down

Organization and planning are the answers. I am sitting here on a computer that has over 110,000 images on two hard drives. I dare anyone to find whatever they want in that haystack. Luckily we have lots of help. Apple and Adobe have software to help. There may be others but these are the ones I am familiar with. Apple has two options. The easy to use iPhoto is great for the snapshot not to serious family shooter. It does some things really well such as Apple account including iPhone integration. Aperture 3 is a big step up and even works well for some professionals. Adobe has Lightroom 5 which in my opinion is a major step up. There is a bit of a learning curve with all of theme but it is well worth it. I have become a Lightroom guru. I make extra money tutoring it along with Photoshop. I have used the others and without question Lightroom is the best for a photographer wanting to have software they will not grow out of. Until the end of May, it is available for $9.99 a month as the “Adobe Photographer’s Bundle” This is an unbelievable deal. If you have ever wanted to get into the Adobe software do it now. There is a huge amount of help on line to get started. It’s the way to go.

Along with organizing Lightroom does much more. The Develop Module is great and much of your processing will not need anything else. GET IT NOW!

Next week  What’s a Lightroom??

Photo of the Week  – New Mexico Pronghorn 1/1500 sec; ISO 800; 400/600 mm; 0 EV Raw file Totally processed in Lightroom

Pronghorn

[Images from the Id] Choices or How to Outsmart a Red-Tail Hawk.

1 Star2 Stars3 Stars4 Stars5 Stars (No Ratings Yet)
Loading...

Images from the Id – Choices or How to Outsmart a Red-Tail Hawk.

Commentary: Generally speaking I have lost confidence in the American people. There was a time when Lincoln’s prediction of “that government of the people, by the people, for the people, shall not perish from the earth.” meant something to this nation. It is amazing if we look at history and how the political parties have flip-flopped. Yes, Republicans are still conservative and Democrats are still liberal but their views on human rights have totally reversed since Lincoln’s time. The“new” Republicans believe in human rights – as long as the rights are in line with their beliefs. Let me give you my spin. I am anti-abortion (be careful with this because it may not mean what you think) BUT I am pro-choice. Yes, you know all about certain cases where it should be done etc. I look at it differently. To be anti-choice is very different than anti-abortion. Against choice doesn’t mean there is no choice but only one choice, in this case – the choice to not have an abortion. My point is being pro-choice on anything also protects my rights and your rights to say no not just yes. Can’t they under stand the word choice.

Making choices in photography is a huge subject and may lead to many blog entries. For now let’s look at birds and one experience.

Last Saturday, I decided to go to a nearby state park and see what I could find. Usually there were some wading birds and at worst some radio controlled aircraft to practice on. I have a general pattern in the park. I usually go to a parking lot that overlooks the lake and has some shore access. It is good for White Pelican, some shore birds and once in a while some surprises. Next, I stop a small wetlands area which usually has a lot of activity. This time I hit jackpot at the parking lot. Near the lot was perched a large Dark-phase Red-Tail Hawk and it seem to be ignoring me. So I started stalking. I slowly walked closer and circled behind the bird. I knew from experience not to approach from the front. Once behind the hawk, it swooped down to capture something and missed. I got some good shots but they were all with the bird going away. My brain and experience kicked in. I took my time and quietly walked down to the shoreline. I took a few Pelican shots, nothing special and talked to a few fisherman. They can give a lot of information since they have the patience I lack. I knew that by approaching from the shore I had cover and could see the bird from the front. Quietly walking up the hill toward the bird I became increasingly excited. It was still there, I was getting a front view, and I was ready. After a few poses, it happened. The bird attacked.  I was so close I actually had to zoom out. Fifteen feet from me, it hit and this time successfully. That poor little Bull Snake had no chance, and I got something special.

Lessons to learn: Always be prepared.- in most cases a situation will never repeat itself. Practice, practice, practice – part of being prepared. Know your subject – most animals have behavior patterns they follow. Be patient – my biggest problem. Take a lot of images at your fastest shutter rate. For birds uses shutter speed of 1/1000 or even faster to stop the action. Know your equipment – what setting work best for this situation.

Red-Tail Attack-001


Lunch-001

This week’s Photo

“The Attack”; f/6.7, 1/2000 sec.(fast Bird), 210/315 mm.. +1 EV (dark Bird) ISO 800. Cherry Creek State Park. Colorado, Adjusted in Lightroom 5.4

Second image “Lunch” f/8,1/1000 sec, ISO 800, +1 EV (too bright but adjusted easily) 400/600 mm After the attack.

[Images from the Id] – Watching Television and the Rule of Thirds

1 Star2 Stars3 Stars4 Stars5 Stars (No Ratings Yet)
Loading...

Images from the Id – Watching Television and the Rule of Thirds

 All night long, all night long

We’re only standing here ’cause somebody might do somebody wrong

All night long, all night long

And we’ll be sleeping with the television on

– Billy Joel


I have no idea what Billy Joel was talking about and how it pertains to the Rule of Thirds but just maybe…

Commentary – This country has many big problems. One of which is drugs. Hey wait a minute I am not talking about Marijuana but Big Pharma- AKA pharmaceutical  companies.   What you ask, is our television on? These are the big drug companies whose purpose is to make money NOT make the human race healthier. Proof? Start with the way they overprice drugs which makes it impossible for many individuals to afford them. Why does medication cost less in other countries? Why do most counties ban advertising drugs? Why does Big Pharma control the way drug patents are done? Why does health insurance cost so much? Are we asleep? Is the television on?

The Rule of Thirds is probably the simplest and easiest route on the road to good photographic composition. When I judge club competitions, it is amazing how many images could be improved by simply applying the Rule of Thirds. Are they asleep with the television on? I must say it is not a perfect rule and there are times to break it but for a start, just begin your composition  with this rule. It is quite simple, Just divide the image into thirds. This is the Tic-Tack-Toe board. Many cameras can actually over lay this in the viewfinder. Learn to place your “center” of interest on one of the intersections of two of these lines (some people call these “power points”). You will a get great improvement in your images. Try not to actually center subjects. An example that may be quite obvious- don’t put someone’s eyes in the center of the frame put them on one of the the power points. Try it and you’ll like it and you may have learned something in your sleep.

This week’s Photo

The Web-001

“The Web”; f/5.6, 1/350 sec., 400/600 mm.. 0 EV ISO 100. Vera Wetlands FL, The early hour makes this.  Final Image adjusted in Lightroom 5.4. Imagine the difference if this were centered.