Rss

Been & Going

[Images from the Id] – Surfin’ Safari or on the Beach?

1 Star2 Stars3 Stars4 Stars5 Stars (No Ratings Yet)
Loading...


When I'm 64-001

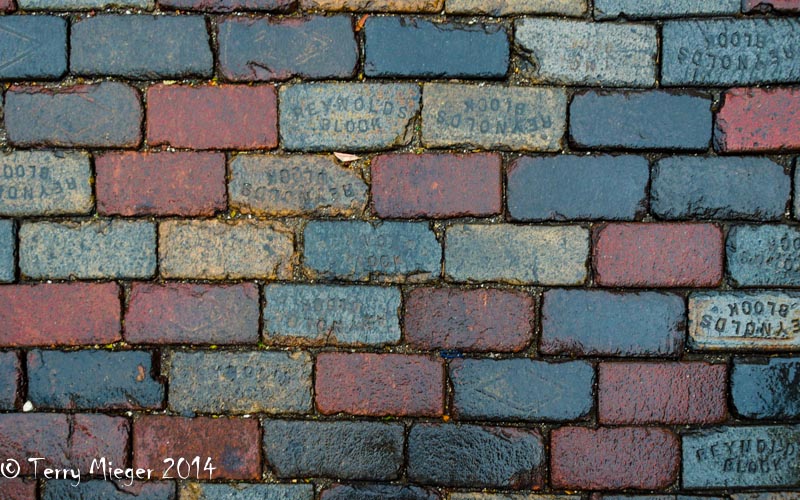
Images from the Id – Surfin’ Safari or on the Beach?

North of the Birch Aquarium is the Cardiff State Beach. Not a particularly unique beach but fun for an inlander. Beach photography can be interesting because of the people and flotsam stranded on the beach. The people can range from surfers and sun bathers to gawking photographers 😉 It’s a joy just walking the edge of the water and trying not to get too wet, then an unusually high wave spoils your attempts.

It is very important to understand the damage salt and saltwater can do to a camera and lens. Always have a UV or Skylight filter on the lens, most of us do that anyway. Second be sure to wipe your equipment carefully with a fresh water dampened cloth to remove any salt etc. from the environment. You really don’t need more than one lens a good zoom such as my 80 mm – 400 mm is perfect even for closeups and debris. What to shot? Less obviously, look at somethings that are different such as; a line up of colorful surfboards, unusual arrangement of kelp etc. Look for colors, textures, repetitive forms or lines. Action is easier to find and can be great fun. The bikini clad girl playing impromptu volleyball is always fun. Then there are the surfers. Use your longest lens and a fast shutter to capture the action and try the slower shutter for showing motion, which is much more difficult. Look iconic positions and flying boards. As you know by now you will have to balance the exposure triangle (ISO-Aperture-Shutter Speed) toward shutter Speed. In fact, you may want to use “Shutter Priority”. Shot suffers with a fast shutter release, 6 frames per second or faster to get great sequences.

Have fun get your feet wet

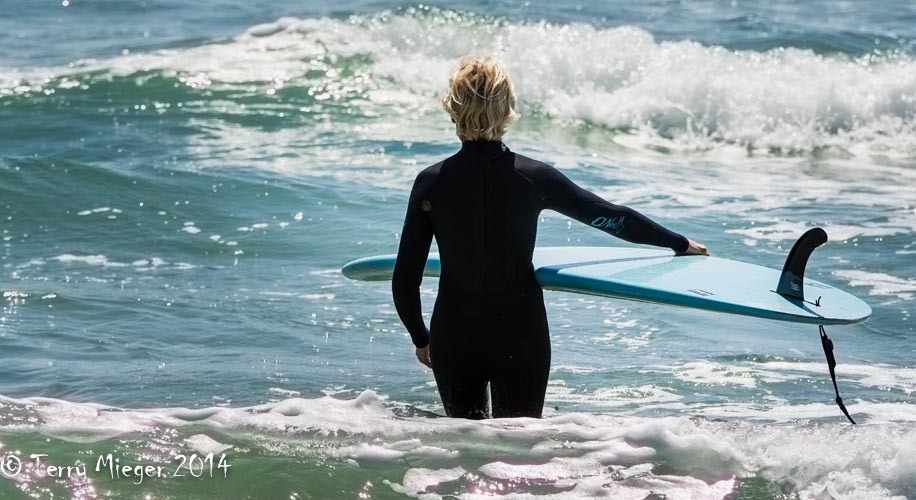
Featured Image “When I’m 64” thanks to my wife for the title. This gal was 64. 1/1500 sec., f/6.7 (comment I prefer not to shot with the lens wide open if I have the choice. The smaller f-stops are sharper up to about f/16), 0 EV, ISO 200, 165 mm/247 mm. focal length. Processed in Lightroom 5.4.

Surfing-001

Surfing-002


Surfing-003

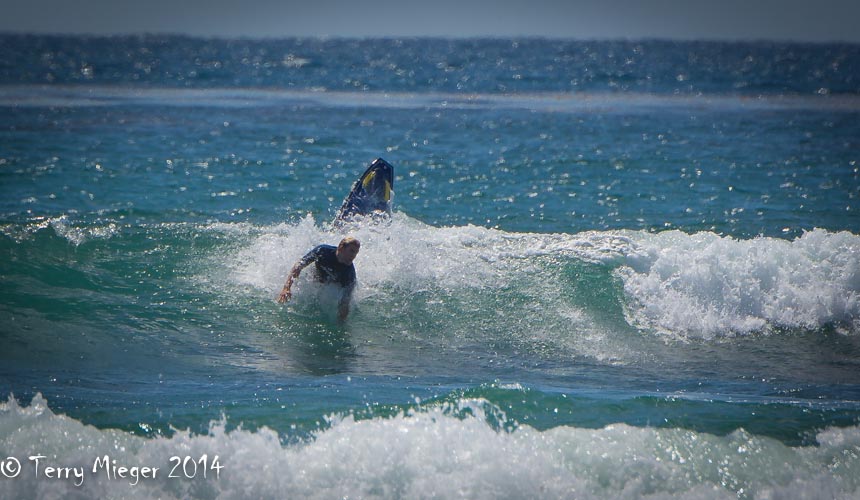
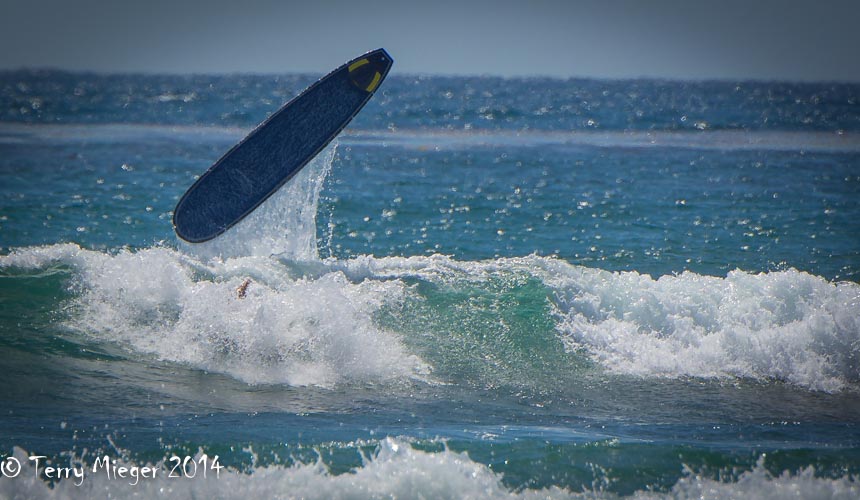
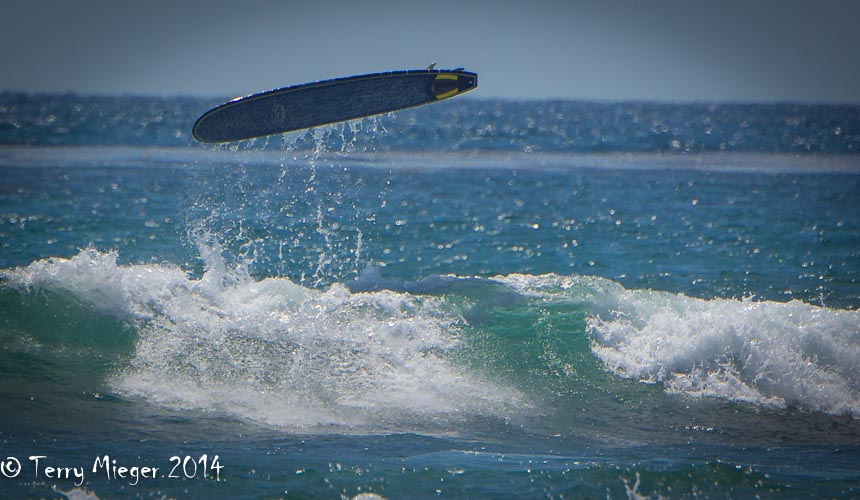
“Oops” three images of a ten shot sequence, 1/1500 sec., f/6.7, 0 EV, ISO 200, 400 mm/600 mm focal length.


[Images from the Id] On the Road Or Swimmin’ in the Tank?

1 Star2 Stars3 Stars4 Stars5 Stars (No Ratings Yet)
Loading...

Images from the Id – On the Road Or Swimmin’ in the Tank?

As of today we have been on the road for 10 days for a combination family visit and photography trip. Photography-wise the first stop was the Birch Aquarium in La Jolla California. This is a nice, although small aquarium that we have visited for many years. This is tough photography. It’s dark, the glass is not always clear and it’s usually wavy. Focusing is difficult and it seems like many times the iPhone gets a better image. The day we were there the were large groups of school field-trippers and pushy toddlers. My usual philosophy is, they have as much right to look and enjoy the facility as I do.   All of these factors influence the ability to get good photographs.

Preparation for a trip to the aquarium. First, look at taking the correct equipment, pick what you will need for the purpose you hope to accomplish. I will usually be looking for the great fish and animal shots but I really like to throw in some “people” shots.. You need to be aware that every public aquarium, zoo or gardens has strict policies governing the use of photographs taken. You must not use any of the images for income unless you pay their fee, which can be quite high. So just use them for your self. If you have a family plan to use the aquarium more as a back drop your activity.

Equipment- most modern cameras handle low light well, some better than others. Use one that does well in low light, higher ISO settings. Take the fastest lens you can. By this I mean one that has a maximum f stop of at least f/2.8. Remember the smaller the number the more the light can get to the sensor. We call this “faster”. The lens should have good vibration reduction (VR on Nikon). Here’s a side note- contrary to what you may have heard, lens stabilization is much better than stabilization in the cameras body. Yes, having stabilization in the camera-body does work with all lenses but having it in the lens has one major advantage, you can actually see it work. I was shooting today and actually could see I forgot to turn the VR on. Back on subject. A good stabilization allows you to shoot at much lower shutter speed. Forget the flash. Most of the time the flash will give nothing but reflections which are a major problem anyway. Using a polarizer would be nice but not practical because of the decrease in light. Learn, I should say practice, good shutter release techniques. You must learn to squeeze the “trigger” Try taking a breath and holding it. You will be amazed how slow of a shutter speed you can handle with stabilization and practice.

At the aquarium, keep checking your settings. Shoot aperture priority, keeping the lens as open as you can considering the depth of field. Your camera should be able to automatically handle the exposure. Shoot RAW. This allows you to “fudge” the exposure a bit to help your shutter speed. You may have to do some manual focusing and that can be difficult. Practice gets better results.

Try shooting something besides just the fish put some people in, especially if they’re family. The people help keep the frustration down and add to your experience and repertoire. Experiment,  have fun this should help you to get started and you will get some great results.

Sea Dragon-001

Lead Photo – Birch Aquarium La Jolla CA. Sea Dragon, 1/125 sec, f/5.0, -1.0 EV, 3200 ISO!! This d7100 Nikon is great for lower noise at these high ISOs. You also need good noise reduction is this case Lightroom 5.4

Shark-001

Photo #2 Atlanta Aquarium is a great place to photograph fish and people. 1/125 sec, f/5.6, -1 1/3 EV (don’t be afraid of playing with EV) ISO 800 18 mm/27 mm.


[Images from the Id] – What do you do with 100,000 images or What’s a Lightroom?

1 Star2 Stars3 Stars4 Stars5 Stars (No Ratings Yet)
Loading...

Images from the Id – What do you do with 100,000 images or What’s a Lightroom?

Years ago photography was quite different for me. First I was young I had very limited income. In fact when I first started with a camera I was earning $1.10 an hour and that was pretty good part time summer work. Kodachrome, my favorite, was a couple of bucks for 36 shots. I used to count images by the dollar. My how life has changed ( I wonder who was the first one to say that). Digital has been a revolution. In fact I will use another cliche. Join the parade or get out of the way. Yea, I know maybe two people who still use film and they can do fantastic work but us everyday people who don’t like to work to hard and are cheap, (translation- use or monetary funds on equipment not film), digital  is the only way. Another factor, the actual quality of the images has gone though the skylight because of the availability of “reasonable” software and images that cost zero to record. This then leads to the obvious result of “spray and pray” shooting. Many wildlife photographers, including yours truly, set their camera to the fast number of shots per second and spray away. To tell the truth, the reason is not to get a good quality image but to get the image at all. What I mean is, thanks to the new digital cameras, images have the correct exposure (to stop the motion), aperture (for the depth of field you want), and white balance (for the correct color rendition).  The challenge for the photographer is to get the “pose” or the “action”.

Last Friday, I went to a a local wetland/park looking for some wadding birds. The advantage of this locale is you can get close to feeding egrets and heron, not easy in Colorado. Not a wadder in sight but the resourceful shooter can usually come up with something. I got Western Painted Turtles.  I have two purposes with this example. First- get the pose, and second- to show that this was done by taking over 200 images, and that was on a bad day! More about the pose later. What do you do with 200 images? How do you cull the junk out? What is the easiest way to process them? Remember one of the disadvantages of raw images is that each must be individually processed. Adobe Lightroom organizes processes and much more. I would never be able to find let alone work on an image without it. I will keep coming back to this in other entries.

Painted Turtle-001

This week’s image: Western Painted Turtle “Saying Hello”: Not much was going on with the birds so we worked on the turtles. This is one of about 40 shots and the only one of any competitive value. If you take enough shots eventually you will see the pose you want – 1/350 sec, f/5.6, 0 EV, ISO 140, 400 mm/ 600 mm


[Images from the Id] Ok, It’s Time to Organize or How Stupid Can a Smart Guy Be?

1 Star2 Stars3 Stars4 Stars5 Stars (No Ratings Yet)
Loading...

Images from the Id – Ok, It’s Time to Organize or How Stupid Can a Smart Guy Be?

Sometimes I get myself into things. I know it’s my own fault but I just can’t help it. It’s sort of like a Greek Tragedy (should that be caps?), where the hero crashes because of a flaw in his character. Not to say I have a flaw or even character. You be the judge, I have given up. An insatiable, relentless and consuming curiosity drives my life. I have to know how everything works and one step farther, why, and worse- I have to tell everyone else about even if they really don’t care.

This week I have been doing something I never thought I would ever do. I never thought I would be a writer, or a public speaker, just ask my past teachers who gave me “Cs” out of kindness and in an attempt to get rid of me. These last two weeks I have done two 1-2 hour presentations, a 10 minute impromptu one and written three segments of an introduction to Photoshop workshop this Saturday. Preparing images for three monthly competitions add to the fun. It’s getting so my wait to the last minute disorganization will no longer fly. Educational/technical writing is much more difficult than imagined. Put together with being President of two camera clubs, actually one is a confederation of four clubs, sometimes I just sit like a zombie in the Lazy-boy chair and stare into the distance. I don’t feel it is stressful but someday it may all come crashing down

Organization and planning are the answers. I am sitting here on a computer that has over 110,000 images on two hard drives. I dare anyone to find whatever they want in that haystack. Luckily we have lots of help. Apple and Adobe have software to help. There may be others but these are the ones I am familiar with. Apple has two options. The easy to use iPhoto is great for the snapshot not to serious family shooter. It does some things really well such as Apple account including iPhone integration. Aperture 3 is a big step up and even works well for some professionals. Adobe has Lightroom 5 which in my opinion is a major step up. There is a bit of a learning curve with all of theme but it is well worth it. I have become a Lightroom guru. I make extra money tutoring it along with Photoshop. I have used the others and without question Lightroom is the best for a photographer wanting to have software they will not grow out of. Until the end of May, it is available for $9.99 a month as the “Adobe Photographer’s Bundle” This is an unbelievable deal. If you have ever wanted to get into the Adobe software do it now. There is a huge amount of help on line to get started. It’s the way to go.

Along with organizing Lightroom does much more. The Develop Module is great and much of your processing will not need anything else. GET IT NOW!

Next week  What’s a Lightroom??

Photo of the Week  – New Mexico Pronghorn 1/1500 sec; ISO 800; 400/600 mm; 0 EV Raw file Totally processed in Lightroom

Pronghorn

[Images from the Id] Choices or How to Outsmart a Red-Tail Hawk.

1 Star2 Stars3 Stars4 Stars5 Stars (No Ratings Yet)
Loading...

Images from the Id – Choices or How to Outsmart a Red-Tail Hawk.

Commentary: Generally speaking I have lost confidence in the American people. There was a time when Lincoln’s prediction of “that government of the people, by the people, for the people, shall not perish from the earth.” meant something to this nation. It is amazing if we look at history and how the political parties have flip-flopped. Yes, Republicans are still conservative and Democrats are still liberal but their views on human rights have totally reversed since Lincoln’s time. The“new” Republicans believe in human rights – as long as the rights are in line with their beliefs. Let me give you my spin. I am anti-abortion (be careful with this because it may not mean what you think) BUT I am pro-choice. Yes, you know all about certain cases where it should be done etc. I look at it differently. To be anti-choice is very different than anti-abortion. Against choice doesn’t mean there is no choice but only one choice, in this case – the choice to not have an abortion. My point is being pro-choice on anything also protects my rights and your rights to say no not just yes. Can’t they under stand the word choice.

Making choices in photography is a huge subject and may lead to many blog entries. For now let’s look at birds and one experience.

Last Saturday, I decided to go to a nearby state park and see what I could find. Usually there were some wading birds and at worst some radio controlled aircraft to practice on. I have a general pattern in the park. I usually go to a parking lot that overlooks the lake and has some shore access. It is good for White Pelican, some shore birds and once in a while some surprises. Next, I stop a small wetlands area which usually has a lot of activity. This time I hit jackpot at the parking lot. Near the lot was perched a large Dark-phase Red-Tail Hawk and it seem to be ignoring me. So I started stalking. I slowly walked closer and circled behind the bird. I knew from experience not to approach from the front. Once behind the hawk, it swooped down to capture something and missed. I got some good shots but they were all with the bird going away. My brain and experience kicked in. I took my time and quietly walked down to the shoreline. I took a few Pelican shots, nothing special and talked to a few fisherman. They can give a lot of information since they have the patience I lack. I knew that by approaching from the shore I had cover and could see the bird from the front. Quietly walking up the hill toward the bird I became increasingly excited. It was still there, I was getting a front view, and I was ready. After a few poses, it happened. The bird attacked.  I was so close I actually had to zoom out. Fifteen feet from me, it hit and this time successfully. That poor little Bull Snake had no chance, and I got something special.

Lessons to learn: Always be prepared.- in most cases a situation will never repeat itself. Practice, practice, practice – part of being prepared. Know your subject – most animals have behavior patterns they follow. Be patient – my biggest problem. Take a lot of images at your fastest shutter rate. For birds uses shutter speed of 1/1000 or even faster to stop the action. Know your equipment – what setting work best for this situation.

Red-Tail Attack-001


Lunch-001

This week’s Photo

“The Attack”; f/6.7, 1/2000 sec.(fast Bird), 210/315 mm.. +1 EV (dark Bird) ISO 800. Cherry Creek State Park. Colorado, Adjusted in Lightroom 5.4

Second image “Lunch” f/8,1/1000 sec, ISO 800, +1 EV (too bright but adjusted easily) 400/600 mm After the attack.

[Images from the Id] – Watching Television and the Rule of Thirds

1 Star2 Stars3 Stars4 Stars5 Stars (No Ratings Yet)
Loading...

Images from the Id – Watching Television and the Rule of Thirds

 All night long, all night long

We’re only standing here ’cause somebody might do somebody wrong

All night long, all night long

And we’ll be sleeping with the television on

– Billy Joel


I have no idea what Billy Joel was talking about and how it pertains to the Rule of Thirds but just maybe…

Commentary – This country has many big problems. One of which is drugs. Hey wait a minute I am not talking about Marijuana but Big Pharma- AKA pharmaceutical  companies.   What you ask, is our television on? These are the big drug companies whose purpose is to make money NOT make the human race healthier. Proof? Start with the way they overprice drugs which makes it impossible for many individuals to afford them. Why does medication cost less in other countries? Why do most counties ban advertising drugs? Why does Big Pharma control the way drug patents are done? Why does health insurance cost so much? Are we asleep? Is the television on?

The Rule of Thirds is probably the simplest and easiest route on the road to good photographic composition. When I judge club competitions, it is amazing how many images could be improved by simply applying the Rule of Thirds. Are they asleep with the television on? I must say it is not a perfect rule and there are times to break it but for a start, just begin your composition  with this rule. It is quite simple, Just divide the image into thirds. This is the Tic-Tack-Toe board. Many cameras can actually over lay this in the viewfinder. Learn to place your “center” of interest on one of the intersections of two of these lines (some people call these “power points”). You will a get great improvement in your images. Try not to actually center subjects. An example that may be quite obvious- don’t put someone’s eyes in the center of the frame put them on one of the the power points. Try it and you’ll like it and you may have learned something in your sleep.

This week’s Photo

The Web-001

“The Web”; f/5.6, 1/350 sec., 400/600 mm.. 0 EV ISO 100. Vera Wetlands FL, The early hour makes this.  Final Image adjusted in Lightroom 5.4. Imagine the difference if this were centered.

[Images from the Id] – Focus stacking or what you get is more than what you see.

1 Star2 Stars3 Stars4 Stars5 Stars (No Ratings Yet)
Loading...

Images from the Id – Focus stacking or what you get is more than what you see.

The human eye has some very special abilities which tend to go unnoticed. One of these is the almost instantaneous focusing off the lens so that it can focus on objects very quickly giving an almost infinite depth of field. You need to remember, depth of field is the “depth” (distance) of focus close and near that is in focus. In a photographic image, as I have said many times, first control of depth of field is the aperture setting. The smaller the opening (bigger the number) the greater the depth of field

Did I promise something political this week? I was thinking about the Tea Party at the same time as shallow depth of field. Think about it.

There are some built in trade-ins using the aperture to control it. Smaller aperture means longer shutter speed, try that in the wind.  Another way around it is focus stacking. Take two or more shots with different areas in focus and combine them so the in focus areas show through and the out of focus are hidden. This is sort of what the brain and eye does.

There are two ways I do it, I am sure there are more, These are what I use. Photoshop Creative Cloud- if you don’t have it buy it!!!! Search for “Adobe Photographers Bundle” for $9.99/month you get Photoshop CC and Lightroom 5.4. and all of the updates. I want to emphasize this is an unbelievable deal and every serious photographer should have it. There are many tutorials available on the specific method but basically you load the stack of images that have different focuses as layers, very easy to do from Lightroom. Then in 2 steps the software masks the layers and once “flatten” give you one file all in focus. Advantages of this system great integration with Lightroom (That’s important to anyone who shoots a large number of images.) It’s very simple, cheap, great for landscapes and can work without a tripod. Disadvantages, Can be difficult to produce the original images especial macro partly because you sometimes need a large number of images for macro.

The second method is Helicon software for macro. Let me warn you this is not cheap. There are two parts to the software. The first Helicon Remote allows you to connect the computer to the camera and the software controls the camera. It is a little buggy and has an interesting learning curve but it can give you up to hundreds of stacked images, if you want them but you can control that. The second application combines the stack based upon their focus. Here again there are a lot of tutorials available. Advantages, great for macro, does a great job of processing, make control of the image taking simple, large number of images possible with great control of the number, faster than Photoshop. Disadvantages, expensive, a little bit difficult with Lightroom, has some bugs which you always have to be aware.


This week’s Photo

Coffee Bean-001

“Coffee Bean”; 20 stacked images with different parts in focus each with     f/8.0, 1/2 sec., 105/157 mm.. 0 EV ISO 100. Images captured with Helicon Remote and processed in Helicon Focus (although Photoshop could have done it) Final image adjusted in Lightroom 5.4

[Images from the Id] – The Ugly the Bad and the Good? Part 3 – the Pinhole Camera

1 Star2 Stars3 Stars4 Stars5 Stars (No Ratings Yet)
Loading...

Images from the Id – The Ugly the Bad and the Good? . Part 3 –  the Pinhole Camera

The Ugly – Ok digital pinhole images just don’t look good.

The Bad – This really has little use except…

The Good – It turns out the concept of the pinhole camera is a great teaching idea for basic photography.

Focus and sharpness are not the same thing. The pinhole camera has infinite focus because there is no lens. The sharpness is dependent upon the diameter of the pinhole , so in the case of my digital attempt it stunk. You can’t get a pinhole small enough for a digital sensor. the ratio of the size of the pinhole to the sensor size is too big. In the real world this works out to why huge enlargements from small sensors is difficult and every flaw in the lens shows up. Sharpness is a perception of the contrast between the edges of small objects. With the pinhole the object can be no smaller the diameter of the hole. So why don’t we make an extremely small pinhole? Light particles (Photons) like all matter has wavelengths (You know your Quantum Physics don’t you?) and as the size of the hole the light is passing through decrease to its wave length it refracts or bends into rainbow like patterns. Not good for photography. Implication? What would happen at very, very small f-stops?

Depth of Field, so this is really related to f-stop and will increase as the f-stop get smaller (number goes up) to the limits of diffraction. So is taking the picture of the interior of that rose best at f-32 and 2 minutes expose? Or do you have other choices?

Inverse Square Law, or Exposure Time – more physics? Yes, the laws of nature really do rule. This law says, “The intensity of a light source decrease as the inverse square of the distance (1/d2) to the source” (or something like that) That is a lot more than most of us would think. This is especially significant in telephoto lens. If we had a working pinhole camera and changed the distance to the sensor from 2 inches to 4 inches would the expose time double. No, remember the Inverse Square Law. The exposure would go down (inverse) by the square of the change. Changed by 2 inches so 22 = 4 time increase in exposure. If the original exposure was 5 sec the new exposure would be 5X4 or 20 sec. Modern cameras get around this by measuring the exposure at the sensor.

Next week we’ll see- maybe politics or religion or I’ll tell you about focus stacking

This week’s Photo

Feather-001

“A Flicker’s Feather”,  Norther Flicker,  ISO 200; 12 sec. shutter speed; f 22; -1 EV; 105/157 mm, Aperture priority; spot metered. Cropped for composition; processed and sharpened in Lightroom 5.3.  This is a good subject to start do macro photography because it is basically all in the same focal plane.

[Images from the Id] What you see is not what you get. Part 2 – the Pinhole Camera

1 Star2 Stars3 Stars4 Stars5 Stars (No Ratings Yet)
Loading...

Images from the Id – What you see is not what you get. Part 2 –  the Pinhole Camera

Cobblestone Road-001

This was the week to try to make a pinhole camera using my DSLR. I hadn’t even thought of this until last week and really got myself into it without much thinking it out. So it came down to what I learned and what I should have known.

The “Project”: Being a trained scientist, actually a Science Teacher, I can’t call this an experiment.

Equipment :

1. Nikon D7100- this is a high pixel, what Nikon calls a “DX” camera, meaning the image sensor is about 50% smaller that a 35 mm negative would be. As we will see, this is significant for a pinhole camera.

2. A stack of three extension tubes. If you like to take closeups buy a set of these as they allow you to focus any lens closer. These gave me a means to mount the “pinhole” on the camera. More hear later too.

3. Aluminum foil, something to make a pinhole in.

4. Tape to mount the Al foil (Remember Al is aluminum?) on the extension tube, Make sure it leaves no residue behind.

5. Tripod and cable release, I was still thinking 10 sec exposure from my college days.

6. Something to shoot, not easy around my house.

7. Slide rule, OK I’m not that old but I’ll bet I am the only one you know who can use one and has taught it. Well a leftover TI-86 will do. Ah OK, I used my iPhone.

Slide Rule images

Construction:

1. Take a piece of Al foil and tape it over the link, non-connection end (It doesn’t have all the little button sticking out) of the stack of extension tubes. Do worry just make sure you do not interfere with the connections and no light gets in around the foil.

2. This is the hard part, puncture as small of a pinhole you can in the center of the foil. Put one off center could be interesting if this works.

3. Mount the “pinhole” on the camera and set all the camera adjustments to Manual and ISO to the lowest- in my case 100.

Procedure- mount the “apparatus” on the tripod stick in the cable releases and point it at something out of doors.

Attempt 1 – 10 sec Oh my, That’s way over exposed and I am getting only the top of my bird feeder. Notice nothing about f-stop or focusing.

Further attempts about 2 seconds worked best outside and 35 sec. inside the house. Interesting very “Grainy”, low resolution and telephoto!


Pinhole-001-2Next week the explanation what you should have learned.

This week’s Photo

Cobblestone Road-001

“Cobblestone”, Saint Augustin, Florida. a wet street,  ISO 100; 1/10 shutter speed; f 7.1; 0 EV; 400/600 mm, Aperture priority; matrix metered. 20/30 mm, Cropped for composition; processed and sharpened in Lightroom 5.3. and Topaz plugins. This is one of my favorite Desktop Images