Rss

Been & Going

[Images from the Id] Ok, It’s Time to Organize or How Stupid Can a Smart Guy Be?

1 Star2 Stars3 Stars4 Stars5 Stars (No Ratings Yet)
Loading...

Images from the Id – Ok, It’s Time to Organize or How Stupid Can a Smart Guy Be?

Sometimes I get myself into things. I know it’s my own fault but I just can’t help it. It’s sort of like a Greek Tragedy (should that be caps?), where the hero crashes because of a flaw in his character. Not to say I have a flaw or even character. You be the judge, I have given up. An insatiable, relentless and consuming curiosity drives my life. I have to know how everything works and one step farther, why, and worse- I have to tell everyone else about even if they really don’t care.

This week I have been doing something I never thought I would ever do. I never thought I would be a writer, or a public speaker, just ask my past teachers who gave me “Cs” out of kindness and in an attempt to get rid of me. These last two weeks I have done two 1-2 hour presentations, a 10 minute impromptu one and written three segments of an introduction to Photoshop workshop this Saturday. Preparing images for three monthly competitions add to the fun. It’s getting so my wait to the last minute disorganization will no longer fly. Educational/technical writing is much more difficult than imagined. Put together with being President of two camera clubs, actually one is a confederation of four clubs, sometimes I just sit like a zombie in the Lazy-boy chair and stare into the distance. I don’t feel it is stressful but someday it may all come crashing down

Organization and planning are the answers. I am sitting here on a computer that has over 110,000 images on two hard drives. I dare anyone to find whatever they want in that haystack. Luckily we have lots of help. Apple and Adobe have software to help. There may be others but these are the ones I am familiar with. Apple has two options. The easy to use iPhoto is great for the snapshot not to serious family shooter. It does some things really well such as Apple account including iPhone integration. Aperture 3 is a big step up and even works well for some professionals. Adobe has Lightroom 5 which in my opinion is a major step up. There is a bit of a learning curve with all of theme but it is well worth it. I have become a Lightroom guru. I make extra money tutoring it along with Photoshop. I have used the others and without question Lightroom is the best for a photographer wanting to have software they will not grow out of. Until the end of May, it is available for $9.99 a month as the “Adobe Photographer’s Bundle” This is an unbelievable deal. If you have ever wanted to get into the Adobe software do it now. There is a huge amount of help on line to get started. It’s the way to go.

Along with organizing Lightroom does much more. The Develop Module is great and much of your processing will not need anything else. GET IT NOW!

Next week  What’s a Lightroom??

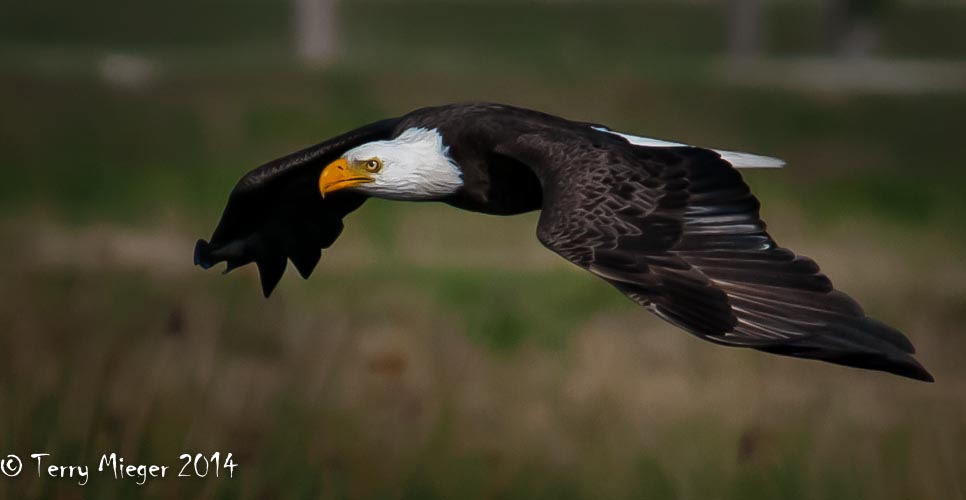
Photo of the Week  – New Mexico Pronghorn 1/1500 sec; ISO 800; 400/600 mm; 0 EV Raw file Totally processed in Lightroom

Pronghorn

[Images from the Id] Choices or How to Outsmart a Red-Tail Hawk.

1 Star2 Stars3 Stars4 Stars5 Stars (No Ratings Yet)
Loading...

Images from the Id – Choices or How to Outsmart a Red-Tail Hawk.

Commentary: Generally speaking I have lost confidence in the American people. There was a time when Lincoln’s prediction of “that government of the people, by the people, for the people, shall not perish from the earth.” meant something to this nation. It is amazing if we look at history and how the political parties have flip-flopped. Yes, Republicans are still conservative and Democrats are still liberal but their views on human rights have totally reversed since Lincoln’s time. The“new” Republicans believe in human rights – as long as the rights are in line with their beliefs. Let me give you my spin. I am anti-abortion (be careful with this because it may not mean what you think) BUT I am pro-choice. Yes, you know all about certain cases where it should be done etc. I look at it differently. To be anti-choice is very different than anti-abortion. Against choice doesn’t mean there is no choice but only one choice, in this case – the choice to not have an abortion. My point is being pro-choice on anything also protects my rights and your rights to say no not just yes. Can’t they under stand the word choice.

Making choices in photography is a huge subject and may lead to many blog entries. For now let’s look at birds and one experience.

Last Saturday, I decided to go to a nearby state park and see what I could find. Usually there were some wading birds and at worst some radio controlled aircraft to practice on. I have a general pattern in the park. I usually go to a parking lot that overlooks the lake and has some shore access. It is good for White Pelican, some shore birds and once in a while some surprises. Next, I stop a small wetlands area which usually has a lot of activity. This time I hit jackpot at the parking lot. Near the lot was perched a large Dark-phase Red-Tail Hawk and it seem to be ignoring me. So I started stalking. I slowly walked closer and circled behind the bird. I knew from experience not to approach from the front. Once behind the hawk, it swooped down to capture something and missed. I got some good shots but they were all with the bird going away. My brain and experience kicked in. I took my time and quietly walked down to the shoreline. I took a few Pelican shots, nothing special and talked to a few fisherman. They can give a lot of information since they have the patience I lack. I knew that by approaching from the shore I had cover and could see the bird from the front. Quietly walking up the hill toward the bird I became increasingly excited. It was still there, I was getting a front view, and I was ready. After a few poses, it happened. The bird attacked.  I was so close I actually had to zoom out. Fifteen feet from me, it hit and this time successfully. That poor little Bull Snake had no chance, and I got something special.

Lessons to learn: Always be prepared.- in most cases a situation will never repeat itself. Practice, practice, practice – part of being prepared. Know your subject – most animals have behavior patterns they follow. Be patient – my biggest problem. Take a lot of images at your fastest shutter rate. For birds uses shutter speed of 1/1000 or even faster to stop the action. Know your equipment – what setting work best for this situation.

Red-Tail Attack-001


Lunch-001

This week’s Photo

“The Attack”; f/6.7, 1/2000 sec.(fast Bird), 210/315 mm.. +1 EV (dark Bird) ISO 800. Cherry Creek State Park. Colorado, Adjusted in Lightroom 5.4

Second image “Lunch” f/8,1/1000 sec, ISO 800, +1 EV (too bright but adjusted easily) 400/600 mm After the attack.

[Images from the Id] – Watching Television and the Rule of Thirds

1 Star2 Stars3 Stars4 Stars5 Stars (No Ratings Yet)
Loading...

Images from the Id – Watching Television and the Rule of Thirds

 All night long, all night long

We’re only standing here ’cause somebody might do somebody wrong

All night long, all night long

And we’ll be sleeping with the television on

– Billy Joel


I have no idea what Billy Joel was talking about and how it pertains to the Rule of Thirds but just maybe…

Commentary – This country has many big problems. One of which is drugs. Hey wait a minute I am not talking about Marijuana but Big Pharma- AKA pharmaceutical  companies.   What you ask, is our television on? These are the big drug companies whose purpose is to make money NOT make the human race healthier. Proof? Start with the way they overprice drugs which makes it impossible for many individuals to afford them. Why does medication cost less in other countries? Why do most counties ban advertising drugs? Why does Big Pharma control the way drug patents are done? Why does health insurance cost so much? Are we asleep? Is the television on?

The Rule of Thirds is probably the simplest and easiest route on the road to good photographic composition. When I judge club competitions, it is amazing how many images could be improved by simply applying the Rule of Thirds. Are they asleep with the television on? I must say it is not a perfect rule and there are times to break it but for a start, just begin your composition  with this rule. It is quite simple, Just divide the image into thirds. This is the Tic-Tack-Toe board. Many cameras can actually over lay this in the viewfinder. Learn to place your “center” of interest on one of the intersections of two of these lines (some people call these “power points”). You will a get great improvement in your images. Try not to actually center subjects. An example that may be quite obvious- don’t put someone’s eyes in the center of the frame put them on one of the the power points. Try it and you’ll like it and you may have learned something in your sleep.

This week’s Photo

The Web-001

“The Web”; f/5.6, 1/350 sec., 400/600 mm.. 0 EV ISO 100. Vera Wetlands FL, The early hour makes this.  Final Image adjusted in Lightroom 5.4. Imagine the difference if this were centered.

[Images from the Id] – Focus stacking or what you get is more than what you see.

1 Star2 Stars3 Stars4 Stars5 Stars (No Ratings Yet)
Loading...

Images from the Id – Focus stacking or what you get is more than what you see.

The human eye has some very special abilities which tend to go unnoticed. One of these is the almost instantaneous focusing off the lens so that it can focus on objects very quickly giving an almost infinite depth of field. You need to remember, depth of field is the “depth” (distance) of focus close and near that is in focus. In a photographic image, as I have said many times, first control of depth of field is the aperture setting. The smaller the opening (bigger the number) the greater the depth of field

Did I promise something political this week? I was thinking about the Tea Party at the same time as shallow depth of field. Think about it.

There are some built in trade-ins using the aperture to control it. Smaller aperture means longer shutter speed, try that in the wind.  Another way around it is focus stacking. Take two or more shots with different areas in focus and combine them so the in focus areas show through and the out of focus are hidden. This is sort of what the brain and eye does.

There are two ways I do it, I am sure there are more, These are what I use. Photoshop Creative Cloud- if you don’t have it buy it!!!! Search for “Adobe Photographers Bundle” for $9.99/month you get Photoshop CC and Lightroom 5.4. and all of the updates. I want to emphasize this is an unbelievable deal and every serious photographer should have it. There are many tutorials available on the specific method but basically you load the stack of images that have different focuses as layers, very easy to do from Lightroom. Then in 2 steps the software masks the layers and once “flatten” give you one file all in focus. Advantages of this system great integration with Lightroom (That’s important to anyone who shoots a large number of images.) It’s very simple, cheap, great for landscapes and can work without a tripod. Disadvantages, Can be difficult to produce the original images especial macro partly because you sometimes need a large number of images for macro.

The second method is Helicon software for macro. Let me warn you this is not cheap. There are two parts to the software. The first Helicon Remote allows you to connect the computer to the camera and the software controls the camera. It is a little buggy and has an interesting learning curve but it can give you up to hundreds of stacked images, if you want them but you can control that. The second application combines the stack based upon their focus. Here again there are a lot of tutorials available. Advantages, great for macro, does a great job of processing, make control of the image taking simple, large number of images possible with great control of the number, faster than Photoshop. Disadvantages, expensive, a little bit difficult with Lightroom, has some bugs which you always have to be aware.


This week’s Photo

Coffee Bean-001

“Coffee Bean”; 20 stacked images with different parts in focus each with     f/8.0, 1/2 sec., 105/157 mm.. 0 EV ISO 100. Images captured with Helicon Remote and processed in Helicon Focus (although Photoshop could have done it) Final image adjusted in Lightroom 5.4

[Images from the Id] – The Ugly the Bad and the Good? Part 3 – the Pinhole Camera

1 Star2 Stars3 Stars4 Stars5 Stars (No Ratings Yet)
Loading...

Images from the Id – The Ugly the Bad and the Good? . Part 3 –  the Pinhole Camera

The Ugly – Ok digital pinhole images just don’t look good.

The Bad – This really has little use except…

The Good – It turns out the concept of the pinhole camera is a great teaching idea for basic photography.

Focus and sharpness are not the same thing. The pinhole camera has infinite focus because there is no lens. The sharpness is dependent upon the diameter of the pinhole , so in the case of my digital attempt it stunk. You can’t get a pinhole small enough for a digital sensor. the ratio of the size of the pinhole to the sensor size is too big. In the real world this works out to why huge enlargements from small sensors is difficult and every flaw in the lens shows up. Sharpness is a perception of the contrast between the edges of small objects. With the pinhole the object can be no smaller the diameter of the hole. So why don’t we make an extremely small pinhole? Light particles (Photons) like all matter has wavelengths (You know your Quantum Physics don’t you?) and as the size of the hole the light is passing through decrease to its wave length it refracts or bends into rainbow like patterns. Not good for photography. Implication? What would happen at very, very small f-stops?

Depth of Field, so this is really related to f-stop and will increase as the f-stop get smaller (number goes up) to the limits of diffraction. So is taking the picture of the interior of that rose best at f-32 and 2 minutes expose? Or do you have other choices?

Inverse Square Law, or Exposure Time – more physics? Yes, the laws of nature really do rule. This law says, “The intensity of a light source decrease as the inverse square of the distance (1/d2) to the source” (or something like that) That is a lot more than most of us would think. This is especially significant in telephoto lens. If we had a working pinhole camera and changed the distance to the sensor from 2 inches to 4 inches would the expose time double. No, remember the Inverse Square Law. The exposure would go down (inverse) by the square of the change. Changed by 2 inches so 22 = 4 time increase in exposure. If the original exposure was 5 sec the new exposure would be 5X4 or 20 sec. Modern cameras get around this by measuring the exposure at the sensor.

Next week we’ll see- maybe politics or religion or I’ll tell you about focus stacking

This week’s Photo

Feather-001

“A Flicker’s Feather”,  Norther Flicker,  ISO 200; 12 sec. shutter speed; f 22; -1 EV; 105/157 mm, Aperture priority; spot metered. Cropped for composition; processed and sharpened in Lightroom 5.3.  This is a good subject to start do macro photography because it is basically all in the same focal plane.

[Images from the Id] What you see is not what you get. Part 2 – the Pinhole Camera

1 Star2 Stars3 Stars4 Stars5 Stars (No Ratings Yet)
Loading...

Images from the Id – What you see is not what you get. Part 2 –  the Pinhole Camera

Cobblestone Road-001

This was the week to try to make a pinhole camera using my DSLR. I hadn’t even thought of this until last week and really got myself into it without much thinking it out. So it came down to what I learned and what I should have known.

The “Project”: Being a trained scientist, actually a Science Teacher, I can’t call this an experiment.

Equipment :

1. Nikon D7100- this is a high pixel, what Nikon calls a “DX” camera, meaning the image sensor is about 50% smaller that a 35 mm negative would be. As we will see, this is significant for a pinhole camera.

2. A stack of three extension tubes. If you like to take closeups buy a set of these as they allow you to focus any lens closer. These gave me a means to mount the “pinhole” on the camera. More hear later too.

3. Aluminum foil, something to make a pinhole in.

4. Tape to mount the Al foil (Remember Al is aluminum?) on the extension tube, Make sure it leaves no residue behind.

5. Tripod and cable release, I was still thinking 10 sec exposure from my college days.

6. Something to shoot, not easy around my house.

7. Slide rule, OK I’m not that old but I’ll bet I am the only one you know who can use one and has taught it. Well a leftover TI-86 will do. Ah OK, I used my iPhone.

Slide Rule images

Construction:

1. Take a piece of Al foil and tape it over the link, non-connection end (It doesn’t have all the little button sticking out) of the stack of extension tubes. Do worry just make sure you do not interfere with the connections and no light gets in around the foil.

2. This is the hard part, puncture as small of a pinhole you can in the center of the foil. Put one off center could be interesting if this works.

3. Mount the “pinhole” on the camera and set all the camera adjustments to Manual and ISO to the lowest- in my case 100.

Procedure- mount the “apparatus” on the tripod stick in the cable releases and point it at something out of doors.

Attempt 1 – 10 sec Oh my, That’s way over exposed and I am getting only the top of my bird feeder. Notice nothing about f-stop or focusing.

Further attempts about 2 seconds worked best outside and 35 sec. inside the house. Interesting very “Grainy”, low resolution and telephoto!


Pinhole-001-2Next week the explanation what you should have learned.

This week’s Photo

Cobblestone Road-001

“Cobblestone”, Saint Augustin, Florida. a wet street,  ISO 100; 1/10 shutter speed; f 7.1; 0 EV; 400/600 mm, Aperture priority; matrix metered. 20/30 mm, Cropped for composition; processed and sharpened in Lightroom 5.3. and Topaz plugins. This is one of my favorite Desktop Images

[Images from the Id] What you see is not what you get

1 Star2 Stars3 Stars4 Stars5 Stars (No Ratings Yet)
Loading...

Images from the Id – What you see is not what you get. Part 1 the Pinhole Camera

Cannon-001

Who ever was the first person to utter the phrase “What you see is what you get” started one of the biggest lies to ever perpetuate itself through civilization. May be in the long run it does serve a purpose in taking the responsibility for careful mental decisions from the producer to the consumer but in the real world do you get what you see? We could debate issues as truth in lending and advertising but that will always be something everyone will talk about but no one will do anything about.

On the other hand in a photograph there is no debate about whether you get what you see or not. What you see is much more complicated than simply what is there in front of you. Seeing is complicated by the addition of perception or what your brain sees. The phrase “It’s in the eye of the beholder” could not be more true. Ten photographers take photographs of the same thing and will usually get 10 differently perceived images. We have different brains so we perceive differently. I have always wondered. Is the color I see as red is the same as that which you see or is it your purple?

The human eye is a wonder. It can see very large variations in contrast (the differences in brightness of areas of an image). It can, subconsciously, continually focus for a perception of infinite depth of field (until we get older and lose true close focusing). If you will remember the Depth of Field is the portion of a scene which is in focus nearer and farther from the lens. Two eye working together give us three-dimensional vision and depth perception. Although there are some newly invented cameras which attempt to match the eye in these respects, generally the camera fails to get close to the eye’s ability.

When I took my first formal photography course in college, the first project was to construct a pinhole camera (Yes this was a long time ago). This had several lessons: First – A pinhole is a lens with resolution limited only by the sizes of the pinhole, smaller is better and the diffraction of the light through the pinhole, bigger is better. As most things in life it’s a balance and you try to get the smallest hole possible. Second – The pinhole has infinite depth of field. Third – the focal length could be easily changed for telephoto or wide angle, introducing the Physics concept of the Inverse Square Law for light intensity. The usual exposure was about 10 sec. or more but the results were interesting and surprising.

Next step let’s see if we can do it with digital

This week’s Photo

“Cannon” Castillo de Marcos St. Augustine  Florida, ISO 100; 1/45 shutter speed; f 19; 0 EV; 70/105 mm, Aperture priority; spot metered. Cropped for composition; processed and sharpened in Lightroom 5.3. A small aperture was used to get the increase in depth of field

[Images from the Id] – Timing or In Search of the Eagle Part 2

1 Star2 Stars3 Stars4 Stars5 Stars (No Ratings Yet)
Loading...

Images from the Id – Timing or In Search of the Eagle Part 2

Eagle 2-001

Now for the truth and the frustration.

Lesson – Bald Eagles are iconic. People have this preconceived idea as how they look. The Eagle does not reach its full “baldness” until its 4th year. This means a lot of eagles don’t look like what people thing they should look like. I wish someone would buy a picture of an immature baldy.

Lesson – Eagles mate for life and in many places don’t tend to nest where they winter, my lake =-(  They usually use the same nest each year and just re-build or add on to it. Photos of nesting eagles are near the top of the list for photos. Study the locals. Get on the “Birders” email list.

Lesson – Birders have different goals than photographers. Don’t be disappointed if you chase one of their leads and the bird is a small dot at 200 yards and sure it’s an eagle but… Last week, I spotted a Peregrine Falcon attacking a flock of crows way up there in the sky. I got a photo but just enough to identify it accurately. Someday…

Lesson – Feeding shots are the best, yellow talons outreaching out with the great fierce look, wings back and no nictitating membrane over the eye.

Lesson – Bald Eagles are equal opportunity feeder. They prefer fish but will eat some small mammals or even dead animals (Was Ben Franklin right in preferring the Turkey for our symbol?) Give the lambs and little children to the Golden Eagle not the Bald Eagle. Like many animals it is very important to expend the least amount of energy for a given amount of prey. It’s not laziness it’s just whether the energy used is less than energy eaten. Because of this they eat carrion, or more spectacularly, steal fish.

Lesson – Learn about your “prey” try to anticipate what it is going to do. Don’t waste your energy.

The Case Story – I and picked up one of my 80mm-400mm lens from the repair shop and they said there was nothing wrong with it, so I went to the lake to “test” it. Arriving I immediately went to the trees where the big guys usually hangout in. Nobody home. Went down to the dam tower, usually a good second choice. Nobody home. So it was down to the lake shore. There it was, soaring high above the lake, a beautiful mature Bald Eagle. I am 3 minutes from the parking lot. While driving and looking, not too hard in this park – no other cars that day, the Eagle starts showing some definite interest in the surface of the water, At 2 minutes from parking, it was obvious it was happening. Tuning the corner in to the boat launch/parking area, the Eagle begins its attack, 10 seconds. My brain is yelling, “Miss, miss, miss” Hoping it would re-attack; small chance of that. Then, ten feet from shore and where I would be in five seconds, I see a large carp get plucked by yellow talons and carried away to the distant trees. I don’t believe in luck but it’s hard to keep saying that I just need to get their more often. Another bird, another day.

This week’s Photo

“Mature Bald Eagle” Viera Wetlands Florida. Again as last week 9 am early, low light,  ISO 800; 1/6000 shutter speed; f 6.7; 0 EV; 400/600 mm, Aperture priority; spot metered. Cropped for composition; processed and sharpened in Lightroom 5.3. The only time I have been eye level with the eagle. Right time in right place? Well, almost. Right after my camera’s buffer filled, the eagle shot straight up in to the air attacking an Osprey carrying a fish. Very spectacular no body got the fish and this time I was 10 seconds early 😉

[Images from the Id] – Timing or In Search of the Eagle Part 1

1 Star2 Stars3 Stars4 Stars5 Stars (No Ratings Yet)
Loading...

Images from the Id – Timing or In Search of the Eagle Part 1

Immature Eagle-001

This is a tale of frustration and success. It repeats itself over and over. Scenario – Every winter the Bald Eagle can be found in locations where it normally isn’t found during the breeding season. Locally, there is a reservoir where photographers have the chance of photographing the eagles at comparatively closer distances. This year I have seen 5-6 adults and 1 or 2 immature individuals.  Sunday morning, we arrived at the park at about 9 am usually eagles don’t have specific feeding or activity time like some birds. We wanted the good morning light but enough to use lower ISO settings.

Lesson – Something you need to understand is that the light for that special photographs is by far the best early in the morning or late in the day, stretching up to about 1-2 hour after sunrise or about 1-2 hour before sunset. This time varies with season. It lasts longer in the winter because of the low sun in northern locations. If you want “The Light” shoot early or late. Midday stinks.

Lesson – Don’t expect a great number of useable images. Too many branches in the way, birds just not doing anything. In the days of film portraits these were fine but now you get to a point where you already have 500 sitting eagles. You need activity and/or interaction. They have to be doing something even if it is just flying. We shot about 150 frames and probably only four I like. This where timing kicks in. If you are not in the right place at the right time and prepared you will miss it. The lucky shot is usually the results of hours of waiting, looking, experience and being in the right spot. There is no such thing as lucky shot just hard work.

Lesson – Camera setting. Use a camera which you can set on continuous servo. This allows the camera to continually focus and not “lock on”. For area use a fairly small spot focus or if you can 3D tracking. You need to experiment. Focusing is tough. Set the shutter rate to the fastest you have. You will through away a lot but you will see the second or third in a sequence will be the sharpest. It has to do with the mechanics of pressing the button. Keep shutter speed up yet be aware of problems of higher ISO. Learn your camera. Accurate focus and fast shutter speed make sharp photos.

Lesson – get close. A longer lens, 400 mm on DX DSLR is good. Walk closer, you probably scare them away but in some areas they have little fear of man and it is possible. Know your location. Don’t crop the image too much know your camera and software.

Next week: The Frustration

This week’s Photo

“Immature Bald Eagle” 9 am early, low light show the underside of the bird,  ISO 400; 1/2000 shutter speed; f 5.6; 1/2 EV over exposed for shadows; 400/600 mm, Aperture priority; spot metered. Cropped for composition; processed in Lightroom 5.3